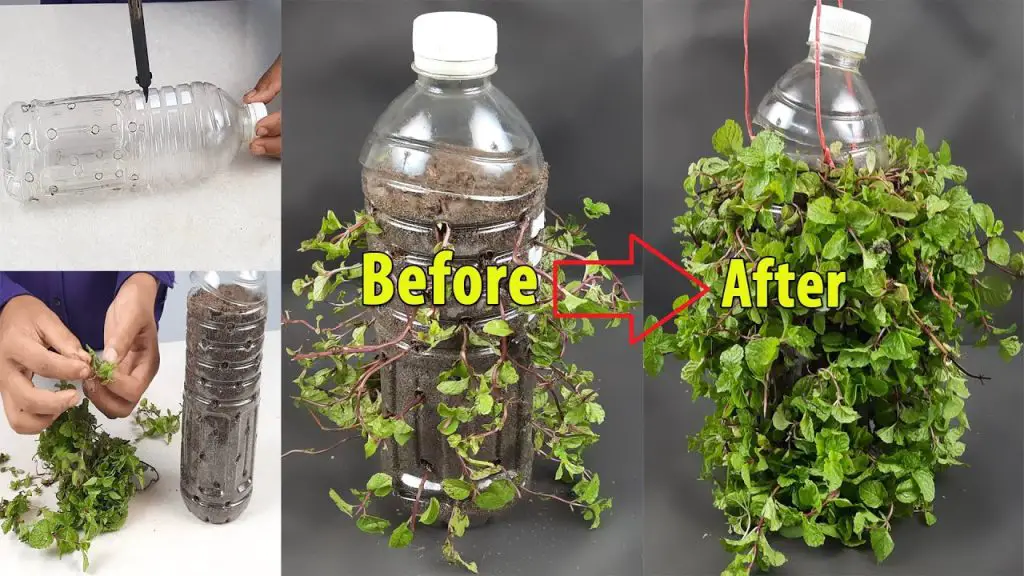
Growing your own herbs at home is not only a fun and rewarding experience, but it can also enhance the flavors of your meals while adding a fresh touch to your home decor. Pudina (mint) is one of the easiest herbs to grow, and it thrives in small spaces, making it ideal for urban gardening or even balconies and windowsills. An innovative and eco-friendly way to grow mint is by recycling plastic bottles into hanging pots. Not only will this help reduce plastic waste, but it also provides a low-cost solution for creating your own herb garden. Here’s a step-by-step guide on how to recycle plastic bottles into hanging pots for growing pudina (mint) at home.
1. Why Choose Mint (Pudina)?
Mint, or pudina, is a fast-growing herb known for its refreshing aroma and flavor. It can be used in a variety of dishes, drinks, and even as a natural remedy. Here’s why mint is the perfect plant to grow in recycled plastic bottles:
- Low Maintenance: Mint requires minimal care, making it ideal for beginners and people with limited gardening space.
- Fast-Growing: Mint grows quickly, and you can begin harvesting fresh leaves within 4-6 weeks of planting.
- Space-Saving: Growing mint in hanging pots saves space and allows you to grow it even in small apartments or homes.
2. Materials You’ll Need
Before you start, gather the following materials:
- Plastic bottles (1 or 2 liters are ideal)
- Sharp scissors or a utility knife
- Drill or small nail (to make drainage holes)
- String or rope (for hanging)
- Potting mix (light, well-draining soil is best)
- Mint cutting (either from a garden center or a small branch from an existing mint plant)
- Water
3. Step-by-Step Guide to Make Hanging Pots from Plastic Bottles
Step 1: Prepare the Plastic Bottle
Start by choosing a plastic bottle with a wide mouth for easy planting. Here’s how to prepare it:
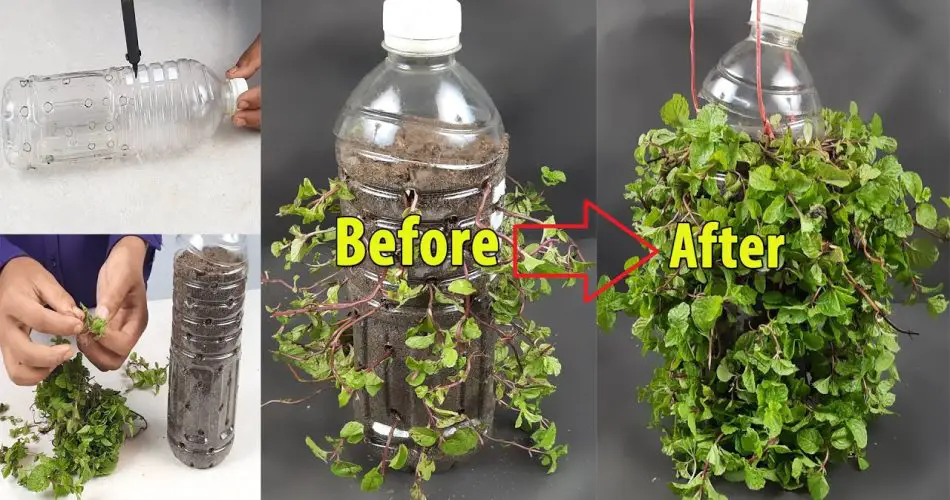
- Cut the Bottle: Using a sharp knife or scissors, carefully cut the plastic bottle in half. You can either cut it vertically (for a taller pot) or horizontally (for a wider pot), depending on how you want your hanging container to look.
- Make Drainage Holes: Drill a few small drainage holes in the bottom of the bottle using a nail or small screwdriver. Good drainage is crucial for plant health, as it prevents waterlogging and root rot.
Step 2: Add Soil to the Bottle
- Fill with Potting Mix: Add well-draining potting mix to the bottle. Leave about 2-3 inches from the top to prevent soil from spilling over when watering.
- Pack the Soil: Gently press down the soil to remove air pockets, ensuring it’s compact but not too tightly packed. The soil should be loose enough for roots to spread easily.
Step 3: Plant the Mint Cutting
- Prepare the Mint Cutting: If you’re using a cutting, ensure that it has a few inches of stem with roots or just leaf nodes. You can also buy small mint plants from a nursery.
- Insert the Cutting: Dig a small hole in the soil and place the mint cutting into it. Gently pack the soil around the roots to secure it in place.
Step 4: Attach the Hanging String
- Make Holes for Hanging: If you want to hang the bottle, create two small holes near the top of the bottle (on opposite sides) using a drill or sharp object.
- Insert the String or Rope: Thread a sturdy piece of string or rope through the holes and tie a knot at the top, ensuring that the bottle is balanced and won’t tip over.
Step 5: Water and Place in a Sunny Spot
- Water the Plant: Give the plant a good watering to settle the soil around the roots. Mint enjoys consistently moist soil, so keep it well-watered, but avoid letting the plant sit in standing water.
- Find a Sunny Spot: Hang the bottle in a place where the mint will get at least 4-6 hours of sunlight per day. A balcony, window ledge, or patio is ideal.
4. Caring for Your Mint Plant
Once your mint is planted, it’s important to provide some basic care to ensure it thrives:
- Water Regularly: Mint likes moist soil, so water it frequently, especially during hot weather. However, make sure the bottle has proper drainage so the plant doesn’t become waterlogged.
- Prune Regularly: Mint grows rapidly and can become leggy. To encourage bushier growth, prune or trim the leaves regularly. This will also help the plant remain compact and prevent it from taking over your hanging pot.
- Fertilize Occasionally: Mint is a low-maintenance plant, but you can feed it with a diluted, organic fertilizer every 4-6 weeks to boost growth.
5. Benefits of Growing Mint in Hanging Pots
Growing mint in recycled plastic bottles has many advantages:
- Eco-Friendly: Recycling plastic bottles for gardening helps reduce plastic waste and supports sustainable living.
- Space-Saving: Hanging pots are perfect for small spaces, allowing you to grow mint on balconies, patios, or even inside your kitchen.
- Easy Harvesting: With mint growing in a hanging pot, you can easily reach the leaves for harvesting without bending down or disturbing the plant.
- Aesthetic Appeal: The sight of hanging mint pots adds a beautiful, green touch to your outdoor or indoor decor, while also providing fresh, aromatic mint leaves for cooking.
6. Common Problems and Solutions
- Leggy Growth: If your mint is growing tall and spindly, it may not be getting enough light. Try moving the pot to a brighter spot with more sunlight or trim back the plant to encourage fuller growth.
- Pests: While mint is relatively pest-resistant, it can still attract aphids or spider mites. Regularly inspect your plant and rinse off any pests with water or use an organic insecticidal soap.
- Overwatering: If you notice yellowing leaves or wilting, your mint may be overwatered. Make sure the hanging pot has proper drainage and allow the soil to dry out slightly between waterings.
Conclusion
Recycling plastic bottles into hanging pots is a clever and sustainable way to grow your own mint (pudina) at home. Not only does this method help reduce plastic waste, but it also allows you to grow a low-maintenance, fast-growing herb that can be used in a variety of dishes and beverages. With minimal effort and a little creativity, you can enjoy fresh mint leaves year-round. So, gather your plastic bottles and get started on your DIY mint garden—it’s an easy and eco-friendly project that anyone can try!