The betel leaf plant (Piper betle) is a tropical vine known for its aromatic leaves that are commonly used in traditional medicine and cuisine. Whether you’re growing it for its culinary uses or as a decorative vine, propagating a betel leaf plant from a single leaf is a simple and rewarding process. Let’s dive into how you can grow your own betel leaf plant from leaf and enjoy its lush greenery at home!
Why Grow Betel Leaf Plant from Leaf?
Growing a betel leaf plant from leaf is a cost-effective and easy way to propagate this beautiful vine. Rather than starting with seeds, which can take longer and require specific conditions, using a leaf cutting is a faster and more efficient method for propagating the plant.
Here are a few reasons to grow betel leaves:
- Traditional Uses: Betel leaves are popular in many Asian cuisines and cultures, especially for making paan (a traditional chewable leaf snack).
- Medicinal Properties: Betel leaves have various medicinal properties and are used in traditional remedies for their antibacterial and anti-inflammatory benefits.
- Aesthetic Value: The glossy, heart-shaped leaves of the betel plant make for an attractive, fast-growing vine that can thrive both indoors and outdoors.
What You’ll Need to Grow Betel Leaf Plant from a Single Leaf
Before starting, gather the following items to successfully propagate your betel leaf plant:
- A healthy betel leaf (Choose a mature, undamaged leaf for best results).
- A sharp pair of scissors or a knife.
- A small container or pot with drainage holes.
- Well-draining soil or potting mix.
- Water and a spray bottle to keep the leaf moist.
- A clear plastic bag or plastic wrap to create humidity.
- Rooting hormone (optional, but helpful for faster root growth).
Step-by-Step Guide to Growing Betel Leaf Plant from a Single Leaf
Step 1: Choose a Healthy Leaf
- Start by selecting a mature, healthy betel leaf from an existing plant. Choose a leaf that is free from damage or disease. The leaf should be fully developed and not too young or too old.
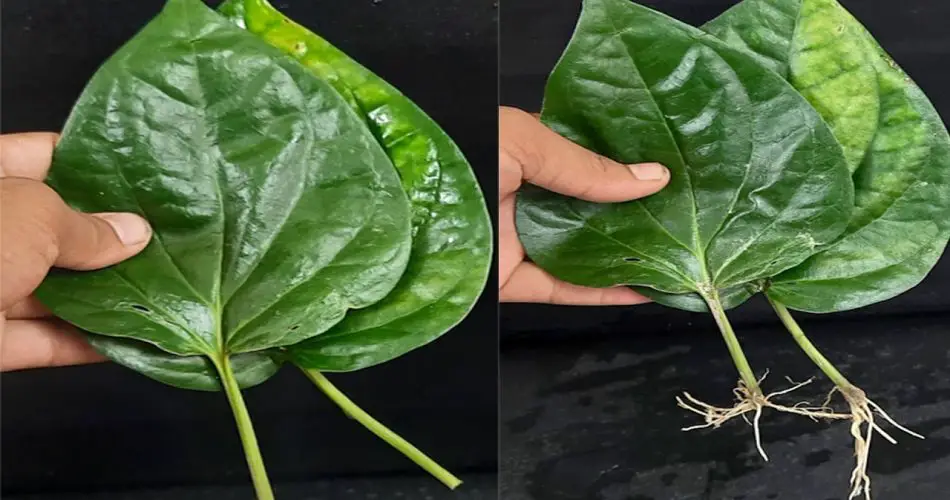
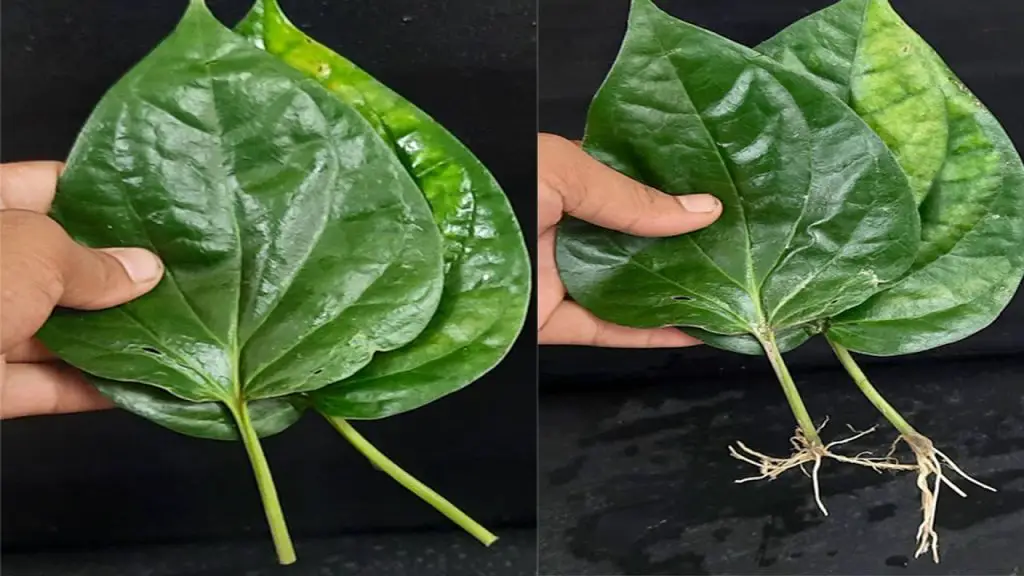
Step 2: Cut the Leaf Properly
- Using a sharp pair of scissors or a clean knife, cut the betel leaf from the vine, leaving about 2-3 inches of stem attached to the base of the leaf. This small portion of stem is essential for rooting.
Step 3: Prepare the Pot and Soil
- Choose a small container or pot that has drainage holes to avoid waterlogging. Fill it with well-draining potting soil, such as a mix of peat moss and perlite. Make sure the soil is light and airy to encourage root development.
Step 4: Apply Rooting Hormone (Optional)
- Although not necessary, applying rooting hormone to the cut end of the leaf stem can help stimulate faster and stronger root growth. This can be particularly useful if you’re having trouble getting the plant to root.
Step 5: Insert the Betel Leaf Cutting into the Soil
- Take the leaf cutting with the stem and gently insert the cut end into the soil. Make sure the leaf is positioned upright with the stem securely buried in the soil. The leaf itself should not touch the soil but should remain above the surface.
Step 6: Create a Humid Environment
- To encourage rooting, cover the entire pot with a clear plastic bag or plastic wrap to trap moisture and create a mini greenhouse effect. This will keep the cutting humid, which is crucial for the roots to develop.
Step 7: Place the Pot in a Warm, Bright Location
- Place the pot in a warm, bright spot, but avoid direct sunlight, as this can scorch the cutting. A bright, indirect light location is ideal for the cutting to grow.
- Keep the soil moist (but not soggy) by spraying it with water regularly. Make sure the soil stays slightly damp, as overwatering can cause rot.
Step 8: Wait for Roots to Develop
- After about 2-4 weeks, you should begin to see roots forming at the base of the cutting. You can gently tug on the cutting to check for resistance, which indicates that the roots are growing.
- Once the cutting has established roots and is showing signs of new growth, it’s time to remove the plastic cover and allow the plant to adjust to normal conditions.
Step 9: Transplant the Rooted Betel Leaf Plant
- After 6-8 weeks, when the betel leaf cutting has rooted well and is growing, you can transplant it into a larger pot or directly into your garden.
- If you’re transplanting into a larger pot, use a rich, well-draining soil mix and make sure the pot is large enough to allow the roots to grow freely.
- Keep the plant in a bright location with indirect light and continue to water it regularly to support its growth.
Caring for Your Betel Leaf Plant
Once your betel leaf plant is established, it’s important to continue providing proper care for it to thrive:
- Watering: Keep the soil moist, but not waterlogged. Betel plants like humidity, so misting the leaves occasionally can be beneficial.
- Light: Betel plants prefer bright, indirect light. Avoid direct sunlight as it can scorch the leaves.
- Temperature: Betel plants thrive in warm temperatures, ideally between 70-85°F (21-29°C).
- Fertilizing: Feed the plant with a balanced liquid fertilizer during the growing season (spring and summer) to support healthy growth.
Conclusion
Growing a betel leaf plant from a single leaf is a rewarding and relatively easy process that can provide you with a beautiful, thriving plant in just a few months. With the right care and attention, your betel leaf cutting will develop roots and flourish into a vigorous vine that can be used for various purposes, from culinary delights to medicinal remedies.
By following this simple guide, you can enjoy the beauty and benefits of your very own betel leaf plant right at home. Happy gardening! 🌱🍃


