Grapes are a delightful fruit that can transform your garden into a lush, fruitful haven. Whether you’re interested in growing grapes for fresh eating, making homemade wine, or simply enjoying their beauty, propagating grape trees is an exciting and rewarding endeavor. If you’re looking for an easy way to start your own grapevine at home, using water is one of the simplest and most effective methods. In this article, we’ll walk you through the steps to propagate grape trees using water and how to care for your new vine.

Why Choose Water for Grape Propagation?
Using water to propagate grape trees is an excellent method for beginners because it’s simple, cost-effective, and requires no special equipment. Water propagation also gives you a visual cue of the rooting process, allowing you to monitor the growth of your grapevine cutting over time. This method helps ensure that the cutting develops healthy roots before being transplanted into soil.
Key benefits of water propagation for grapevines:
- Low Maintenance: It requires minimal equipment and attention.
- Increased Success Rate: By seeing the roots grow in water, you can ensure they are strong before planting.
- Cost-effective: It eliminates the need for rooting hormones or specialized tools.
Materials Needed
Before you begin propagating your grapevine, gather these materials:
- Healthy Grape Cutting: Select a healthy vine with no signs of disease or damage. It’s best to take the cutting during the dormant season (late winter or early spring) when the vine is not actively growing.
- Clean Container: Any clear jar or glass container will work well. The transparency helps you monitor the root growth.
- Water: Use clean, room temperature water.
- Sharp Knife or Pruning Shears: To take the cutting.
- Rooting Hormone (optional): While not necessary, some gardeners prefer to dip the cutting in rooting hormone to speed up the process.
Step-by-Step Guide to Propagate Grapes with Water
1. Select and Prepare the Cutting
Start by choosing a healthy grapevine. The cutting should be about 6-8 inches long and include at least 2-3 nodes (the small bumps along the stem where leaves or buds grow).
- Cut the Vine: Using sharp pruning shears or a knife, make a clean cut just below a node.
- Remove Excess Leaves: Strip off the lower leaves of the cutting, leaving a couple of leaves at the top. This will help the cutting focus energy on root development rather than leaf growth.
- Optional Step: If you wish, dip the cut end of the vine into rooting hormone to encourage faster root development.
2. Place the Cutting in Water
Once your cutting is prepared, it’s time to place it in water:
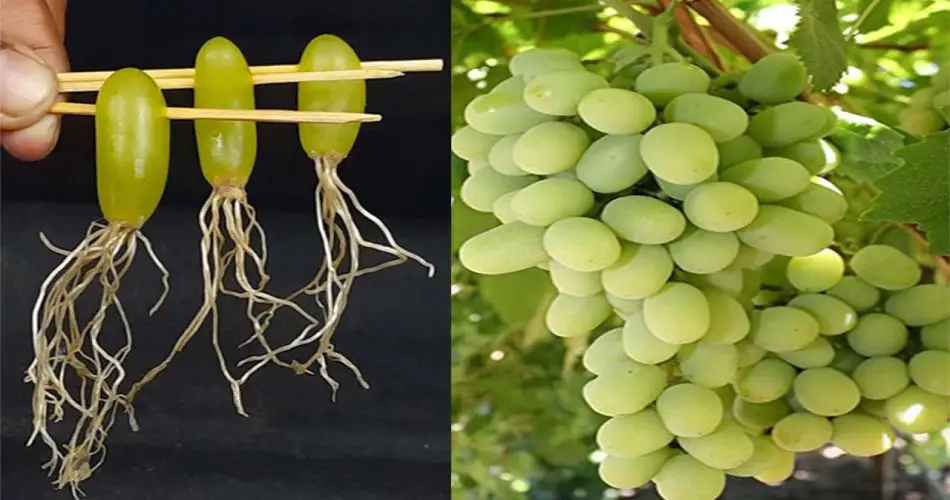
- Position the Cutting: Place the bottom of the cutting (the part you cut) into your container filled with water. Ensure that at least one node is submerged, as this is where the roots will begin to form.
- Avoid Submerging Leaves: The leaves should remain above the water level to prevent rot.
3. Change the Water Regularly
To encourage healthy root growth, it’s essential to maintain clean water.
- Change the Water: Replace the water every 2-3 days to prevent stagnation and algae growth. Fresh water ensures that your cutting has access to the nutrients it needs.
- Monitor the Roots: Over time, you’ll see small roots starting to grow from the submerged node. This process can take anywhere from 2 to 6 weeks, depending on the variety of grapevine and environmental conditions.
4. Provide the Right Environment
While propagating in water, it’s important to place your cutting in the right environment:
- Sunlight: Place the container in a spot with bright, indirect sunlight. Direct sunlight can overheat the water and harm the cutting.
- Temperature: Grape cuttings root best at room temperature, typically between 65-75°F (18-24°C).
Step 5: Transplant the Cutting into Soil
Once the cutting has developed a healthy root system, it’s time to transplant it into soil.
- Prepare the Soil: Choose a well-draining soil mix designed for container gardening or grapevines. Make sure the pot has drainage holes to avoid waterlogging.
- Plant the Cutting: Gently transplant the cutting into the soil, making sure the roots are well-spread out and the cutting is stable.
- Water: Water the soil lightly, ensuring it remains moist but not soggy.
Caring for Your New Grape Vine
Now that your grape cutting has been successfully propagated and transplanted, it’s time to give it the proper care:
- Sunlight: Grape vines need plenty of sunlight, so place the young vine in a sunny spot. Ideally, grapevines need at least 6-8 hours of direct sunlight per day.
- Watering: Water the vine regularly, but be careful not to overwater. Allow the soil to dry slightly between watering to avoid root rot.
- Fertilizing: After the vine has established roots and is growing well, you can feed it with a balanced fertilizer designed for fruiting plants to encourage robust growth and fruit production.
When to Expect Grapes from Your New Vine
Growing grapes from cuttings typically takes time. Depending on your location and climate, it can take anywhere from 1 to 3 years before your new grapevine starts producing fruit. Be patient, and continue to care for the vine by pruning it regularly to encourage strong growth and better fruiting.
Conclusion
Propagating grape trees using water is an easy and effective method that allows you to grow new vines at home with minimal effort. By following the simple steps outlined above, you can enjoy the process of growing your very own grapevine and, in time, harvest fresh, delicious grapes. Whether you’re starting a small vine for home decoration or planning to cultivate a vineyard, this method of propagation provides a great foundation for success. Happy gardening! 🍇


