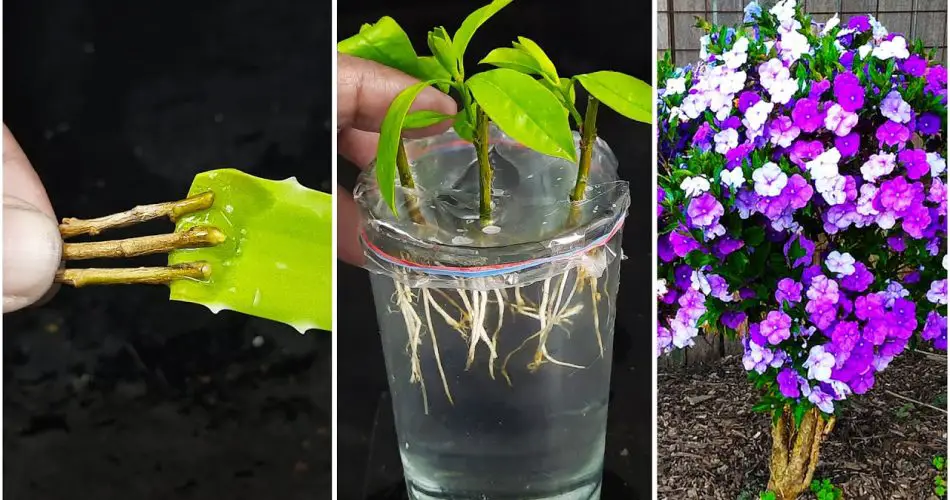
The Yesterday, Today, and Tomorrow plant (Brunfelsia pauciflora), known for its color-changing flowers, is a unique and beautiful addition to any garden or indoor space. This striking plant gets its name from the way its flowers transition in color throughout the day — starting as purple, then changing to lavender, and finally fading to white by the evening. If you have one of these plants and want to propagate it to grow more, shoot tip cutting is a great method to consider. This article will guide you on how to propagate your Yesterday, Today, and Tomorrow plant using the shoot tip cutting technique.
What is the Yesterday, Today, and Tomorrow Plant?

The Yesterday, Today, and Tomorrow plant is a tropical shrub native to Brazil and other parts of South America. It is highly valued for its vibrant flowers and pleasant fragrance. This plant can grow as a shrub or small tree and is ideal for containers or garden beds in warmer climates. In cooler regions, it is often grown indoors.
The flowers of this plant are its most distinguishing feature, and the color-changing blooms make it a stunning addition to any garden. If you want to propagate this plant, using shoot tip cuttings is an efficient and reliable method.
Materials You’ll Need for Propagation:
Before you start, make sure you have the following materials:
- A healthy Yesterday, Today, and Tomorrow plant (Brunfelsia pauciflora)
- A sharp knife or pruning shears
- A small pot with well-draining soil
- A rooting hormone (optional, but can help improve rooting success)
- A clear plastic bag or a plastic dome to create humidity
- Water for misting
- A container for water (if rooting in water)
Step-by-Step Guide to Propagate the Yesterday, Today, and Tomorrow Plant
Step 1: Select a Healthy Shoot Tip Cutting
The first step is to select a healthy shoot tip from the plant. Look for a young, green stem that is about 4-6 inches long and has a few leaves at the tip. Make sure the cutting is taken from a non-flowering part of the plant to ensure the best chances of success.
- Use sharp pruning shears or a knife to make a clean cut just below a leaf node. This is important because the node is where roots will develop.
Step 2: Remove Lower Leaves
Once you’ve taken your cutting, gently remove the lower leaves to expose the stem. Leave at least one or two leaves at the top of the cutting. This will help the cutting focus its energy on root development rather than maintaining leaves.
If you’d like to improve the chances of successful rooting, you can dip the cut end of the stem into rooting hormone before planting. This hormone encourages the development of roots.
Step 3: Plant the Cutting in Soil or Water
You have two options for rooting your cutting — you can either root it in soil or water.
- Rooting in Soil: Prepare a small pot with well-draining soil, such as a mix of peat and perlite. Insert the cutting into the soil about 2-3 inches deep, ensuring that the cut end is firmly placed in the medium. Lightly press the soil around the cutting to secure it in place.
- Rooting in Water: If you prefer to root the cutting in water, place the cut end of the stem into a container of water, making sure that only the lower part of the cutting is submerged. Change the water every few days to keep it fresh and prevent the growth of algae.
Step 4: Create Humidity for Root Development
Whether you are rooting your cutting in soil or water, it’s important to maintain high humidity around the cutting to encourage rooting.
- If rooting in soil, cover the cutting with a clear plastic bag or place the pot in a plastic dome to trap moisture. This helps create a mini greenhouse effect that keeps the cutting warm and moist.
- If rooting in water, place the container in a warm, bright location but avoid direct sunlight, which can be too harsh for the cutting.
Step 5: Wait for Roots to Develop
Place your pot or container in a bright, indirect light spot. Avoid placing it in direct sunlight as this can dry out the cutting too quickly. After about 2-4 weeks, check for root growth. You can gently tug on the cutting to feel if roots have formed. If you’re rooting in water, you may see tiny roots beginning to form.
Step 6: Transplant the Cutting
Once the cutting has developed a strong enough root system (you’ll typically see roots that are a few inches long), it’s time to transplant it into a larger pot with regular potting soil. Water the new plant thoroughly after transplanting to help it settle into its new environment.
- Ensure the new pot has good drainage to prevent waterlogging and root rot.
- Place the new plant in a location that receives bright, indirect light to help it acclimate.
Tips for Caring for Your New Yesterday, Today, and Tomorrow Plant
Once your cutting has successfully rooted and transplanted, here are some care tips to ensure your new plant thrives:
- Watering: Keep the soil evenly moist but not waterlogged. Let the top of the soil dry out slightly before watering again.
- Fertilizing: Feed your plant with a balanced fertilizer during the growing season (spring and summer) to promote healthy growth.
- Light: Ensure your plant gets plenty of bright, indirect sunlight. If growing indoors, place it near a window that gets good light but avoid direct afternoon sun, which can scorch the leaves.
- Pruning: Prune your plant to maintain its shape and remove any dead or damaged growth.
Conclusion
Propagating your Yesterday, Today, and Tomorrow plant through shoot tip cuttings is an easy and effective way to expand your collection of these beautiful, color-changing plants. With just a few simple steps, you can enjoy more vibrant flowers and share the beauty of Brunfelsia pauciflora with friends and family. So, grab your pruning shears and start propagating today — your new plants will thank you! 🌸


