Coleus (Solenostemon scutellarioides) is a popular, vibrantly colored plant known for its stunning foliage and ability to thrive in both sunlight and partial shade. While you can grow coleus from seeds or cuttings, leaf propagation is one of the simplest and most rewarding ways to create new plants. In this guide, we will teach you how to propagate coleus from a single leaf, helping you multiply your plants in an easy, cost-effective way.
Why Propagate Coleus from a Leaf?
Propagating coleus from a leaf is an excellent method for gardeners looking to:
- Create multiple plants without purchasing new ones.
- Preserve a unique or variegated variety you love.
- Save money on buying new plants.
The process is straightforward, and you don’t need any special tools or equipment, making it perfect for beginners and seasoned gardeners alike.
What You’ll Need for Leaf Propagation
Before you start, gather the following supplies:
- A healthy coleus plant with vibrant, undamaged leaves.
- Sharp scissors or pruning shears to cut the leaf cleanly.
- A small container (a glass or jar) for rooting the leaf.
- Water for the rooting process.
- Well-draining soil (for when you transplant the rooted leaf).
- A clear plastic bag or a plastic dome (optional, to maintain humidity).
Step-by-Step Instructions: How to Propagate Coleus from a Single Leaf
1. Select the Right Coleus Leaf
Start by selecting a healthy leaf from the coleus plant. Make sure it is mature and free from any pests, spots, or damage. A larger leaf works best, as it has more energy to support the rooting process.
- Tip: For better results, choose a leaf that is fully developed but not too old. A leaf that is too young or too old may not root effectively.
2. Cut the Leaf Properly
Using sharp scissors or pruning shears, cut the leaf just below the petiole (the stalk that attaches the leaf to the stem). It’s important to make a clean cut to avoid damaging the leaf and to give the plant a better chance at rooting.
- Tip: You can also cut a portion of the stem (petiole) if you plan to use it as a cutting, but for leaf propagation, the focus is on the leaf itself.
3. Prepare the Watering Container
Fill a glass jar or small container with water. Make sure the water level is high enough to submerge the cut end of the petiole but not so high that it touches the leaf itself.
- Tip: Use filtered or distilled water if possible, as tap water may contain chemicals that could inhibit root growth.
4. Place the Leaf in Water
Place the cut coleus leaf into the water with the petiole submerged but the leaf itself above the water. Ensure the container is placed in a bright area, but out of direct sunlight, as too much sun can cause the leaf to wilt or rot.
- Tip: To help retain moisture, you can loosely cover the container with a clear plastic bag or a plastic dome, which will create a mini greenhouse effect and maintain humidity around the leaf.
5. Change the Water Regularly
To prevent the water from becoming stagnant, change it every 2-3 days. This helps to keep the water clean and ensures healthy root development. Over time, you will begin to notice small roots starting to emerge from the petiole.
- Tip: Be patient! It can take anywhere from 2-4 weeks for roots to develop, depending on environmental conditions and the health of the leaf.
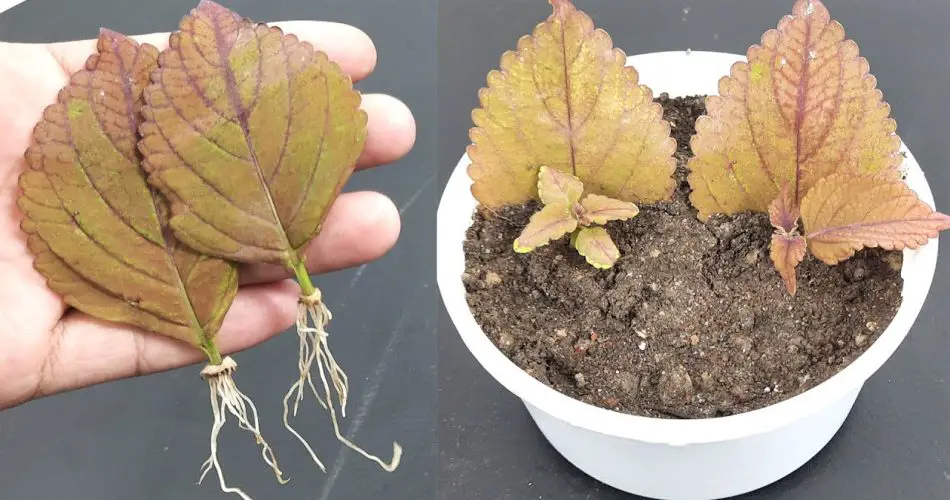
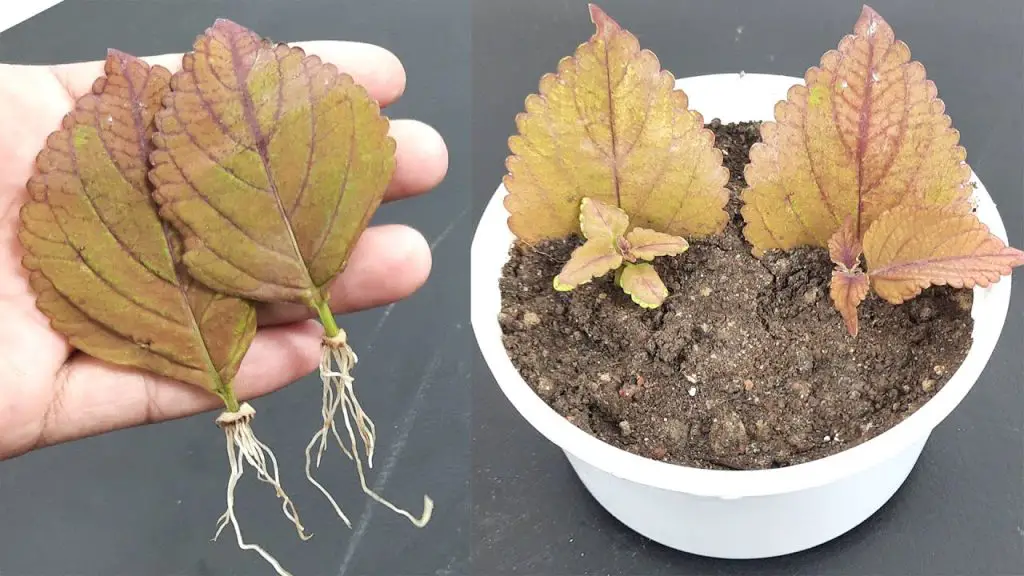
6. Transplant the Rooted Leaf into Soil
Once the coleus leaf has developed strong roots (usually 1-2 inches long), it’s time to transplant it into well-draining soil. Prepare a small pot with a light, airy soil mix, such as cactus mix or a general potting mix mixed with perlite for better drainage.
- Tip: Ensure the pot has drainage holes to prevent waterlogging, which can cause root rot.
7. Plant the Rooted Leaf
Carefully transplant the rooted coleus leaf into the soil, burying the roots and the base of the petiole. Press the soil gently around the leaf to ensure it’s secure.
- Tip: Water the soil lightly after planting, but avoid soaking it. Overwatering can harm the newly rooted plant.
8. Care for Your New Coleus Plant
After planting the rooted leaf, place the pot in a bright location with indirect sunlight. Keep the soil slightly moist, but not soggy. As the coleus grows, you’ll start to see new leaves and shoots sprouting from the base of the original leaf.
- Tip: Once the plant has started to grow, you can begin treating it like a regular coleus plant. Feed it with a balanced liquid fertilizer every 2-4 weeks during the growing season.
Common Problems and Solutions in Coleus Leaf Propagation
- No roots after a few weeks: If the leaf hasn’t developed roots after 4 weeks, it could be due to insufficient water, too much sunlight, or an unhealthy leaf. Try moving it to a shadier spot and make sure the water is refreshed regularly.
- Rotting leaf: If the leaf starts to rot, it may have been exposed to too much moisture or direct sunlight. Remove the rotting leaf and try again with a fresh, healthy leaf.
- Leggy growth: If your new coleus plant grows too tall and spindly, it could be because it’s not getting enough light. Move it to a brighter location and pinch off the top growth to encourage bushier growth.
Conclusion: Enjoy Your New Coleus Plants!
Propagating coleus from a single leaf is a fun and easy way to create new plants without spending money on store-bought ones. By following these simple steps, you can multiply your coleus collection and enjoy vibrant, colorful foliage in your home or garden. Remember, patience is key—give your leaf the right conditions to root, and soon you’ll have a healthy, thriving coleus plant ready to add beauty to your space. 🌿


