Growing your own lemon tree can be incredibly rewarding, and with the right techniques, you can easily propagate a lemon tree from cuttings at home! One of the most innovative and successful methods to propagate a lemon tree is by using tissue paper. This simple technique ensures you can enjoy fresh lemons in your garden, even if you don’t have a mature tree to start with.
In this article, we’ll guide you step-by-step on how to propagate a lemon tree from cuttings using tissue paper, guaranteeing 100% success if followed correctly.

Why Use Tissue Paper for Lemon Tree Cuttings?
Using tissue paper to propagate lemon tree cuttings offers several benefits:
- Promotes Root Growth: Tissue paper helps maintain moisture levels around the cutting, encouraging faster root development.
- Prevents Mold: It acts as a barrier to mold growth by providing proper air circulation while keeping the cutting hydrated.
- Inexpensive and Easy: Tissue paper is a cost-effective and readily available material, making it a great option for those new to plant propagation.
Materials Needed:
Before you start propagating your lemon tree, make sure you have the following materials:
- A healthy lemon tree cutting (approximately 4-6 inches long)
- Tissue paper (preferably plain, absorbent paper)
- A plastic bag or cling film (to create a humid environment)
- Sharp scissors or a knife (to take the cutting)
- A small pot with well-draining soil
- Water (for misting)
- Rooting hormone (optional, but recommended for faster root growth)
- Rubber band or string (to secure the tissue paper)
Step-by-Step Guide: Propagating Lemon Tree from Cuttings with Tissue Paper
1. Select a Healthy Cutting
- Start by selecting a healthy lemon tree branch that is around 4-6 inches in length.
- The cutting should be from a young, non-flowering stem. Look for a stem with healthy leaves and no visible damage.
- Using sharp scissors or a knife, cut the branch just below a leaf node (where the leaves are attached).
2. Prepare the Cutting
- Trim any leaves on the lower half of the cutting to prevent them from touching the soil and potentially rotting.
- Optional: Dip the bottom end of the cutting into rooting hormone to increase the chances of successful root formation.
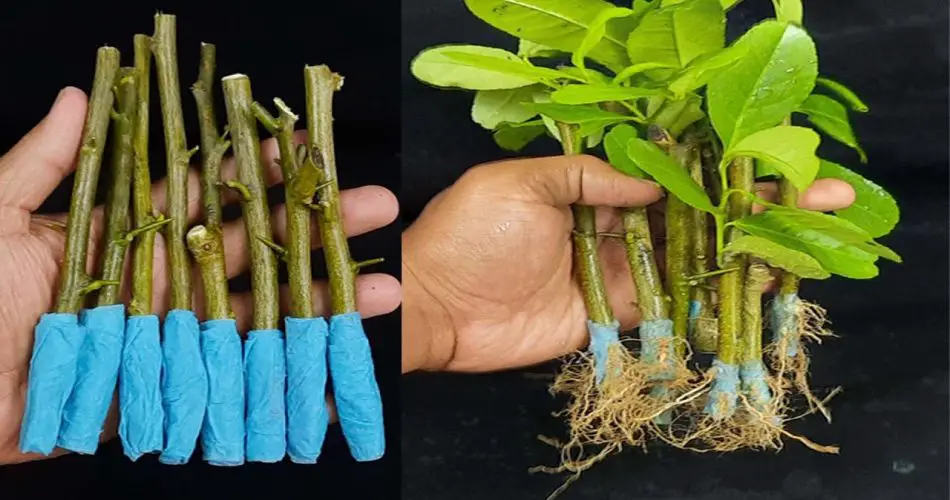
3. Wrap the Cutting with Tissue Paper
- Dampen a piece of tissue paper with water (but don’t soak it).
- Carefully wrap the cutting’s bottom (the part that will go into the soil) in the tissue paper. The tissue should cover the exposed end of the cutting completely.
- Ensure that the tissue is moist but not dripping wet. You want it to stay moist for extended periods without causing excess water to collect.
4. Secure the Tissue Paper
- Use a rubber band or string to secure the tissue paper around the cutting. This helps keep the tissue in place and prevents it from slipping off.
5. Create a Humid Environment
- Once the cutting is wrapped, place it inside a plastic bag or cover it with cling film. This will create a humid micro-environment around the cutting, mimicking a greenhouse.
- Be sure the plastic does not touch the cutting, allowing airflow while still maintaining moisture.
6. Place the Cutting in a Warm Spot
- Place the tissue-wrapped cutting in a bright, indirect sunlight area, such as near a window that doesn’t receive direct sunlight.
- Avoid placing it in direct sunlight, as this can dry out the cutting too quickly and hinder root development.
7. Maintain Moisture Levels
- Regularly mist the tissue paper with water to keep it moist but not soggy.
- Check the cutting periodically to ensure the tissue paper is still damp. You can also lightly water the cutting if the soil begins to dry out.
- Make sure the plastic bag or cling film is not sealed too tightly. It should allow for some airflow to prevent mold growth.
8. Transplant the Cutting
- After 2-4 weeks, you should start seeing root development. Gently check the bottom of the cutting to ensure roots are forming.
- Once a healthy root system has developed, carefully remove the cutting from the tissue paper and plant it in a small pot filled with well-draining soil.
- Continue to keep the plant in a humid environment until it adjusts to the new pot.
Tips for Success
- Humidity is key to successful propagation, so make sure to keep the cutting in a consistently humid environment during the first few weeks.
- Patience is important. It might take up to a month for roots to form, so don’t rush the process.
- If the cutting is struggling, remove the plastic cover for a day to let it breathe, but be sure to put it back afterward.
Conclusion: Enjoy Your New Lemon Tree!
Propagating a lemon tree from cuttings using tissue paper is a simple and effective technique that guarantees high success rates. With just a little patience and the right environment, you can grow your very own lemon tree that will bear delicious fruits for years to come.
By following this easy-to-implement method, you’ll be on your way to enjoying the benefits of your own homegrown lemons—a perfect addition to your garden or indoor plant collection! 🍋🌱