Growing roses from cuttings is a rewarding and cost-effective way to propagate new plants, especially if you want to expand your rose garden without purchasing new ones. One effective method for encouraging rose cuttings to root is the bottle covering technique, which creates a mini greenhouse effect. This method is simple, inexpensive, and works well for beginners. In this article, we will guide you through the steps of growing roses from cuttings using a plastic bottle covering.
What You Need to Grow Roses from Cuttings:
- Healthy rose cutting (6-8 inches long)
- Sharp scissors or pruning shears
- Plastic bottle (preferably clear, with the bottom cut off)
- Rooting hormone (optional but helpful)
- Well-draining potting soil
- Small pot or container
- Water
Why Use a Bottle to Cover Rose Cuttings?
Using a plastic bottle to cover your rose cutting creates a humid micro-environment that helps to prevent moisture loss and encourages the cutting to root. The clear plastic allows light to reach the cutting, while still protecting it from direct sunlight and wind. This makes it a great alternative to more expensive propagation kits or greenhouse setups.
Step-by-Step Guide: Growing Roses from Cuttings Using a Bottle Covering
Step 1: Take the Rose Cutting
Select a healthy rose stem that has not yet flowered. The best time to take cuttings is in late spring or early summer when the plant is actively growing.
- Use sharp scissors or pruning shears to cut a 6–8 inch stem just below a leaf node.
- Make sure the cutting is free of flowers and leaves near the bottom of the cutting to avoid rotting when placed in soil.
Step 2: Prepare the Cutting for Planting
Before planting your cutting, dip the cut end of the stem into rooting hormone. This will promote root growth and help the cutting heal. Rooting hormones can be purchased at most garden centers, but they are optional if you don’t have them.
- Remove any remaining leaves near the base of the cutting.
- Make a small cut at the bottom of the cutting (diagonal) to increase the surface area for root formation.
Step 3: Prepare the Pot and Soil
Choose a small pot with drainage holes. Fill the pot with well-draining potting soil to ensure proper water drainage. Lightly water the soil to moisten it before inserting the cutting.
- Use potting soil specifically formulated for cuttings, or make your own mix by combining peat, perlite, and sand.
Step 4: Insert the Cutting into the Soil
- Make a small hole in the soil with your finger or a stick.
- Insert the bottom of the rose cutting into the hole, making sure it’s securely planted.
- Gently pack the soil around the cutting to ensure it stays in place.
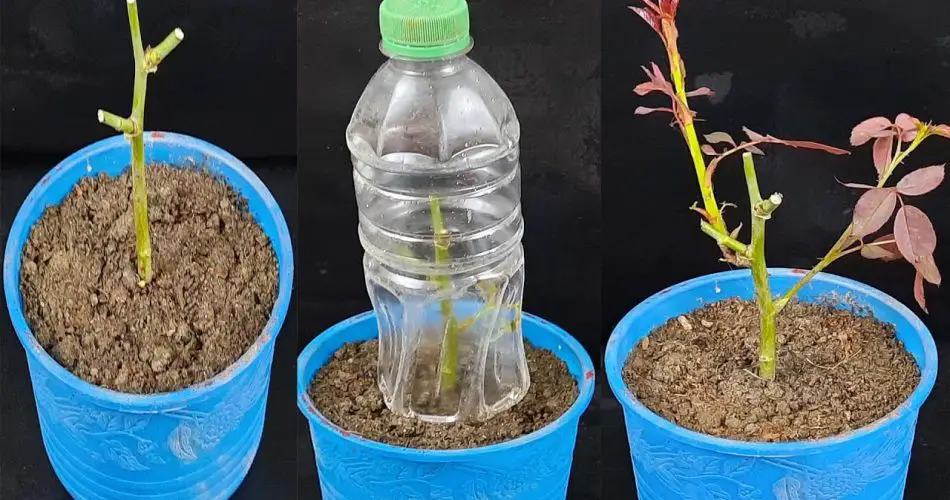
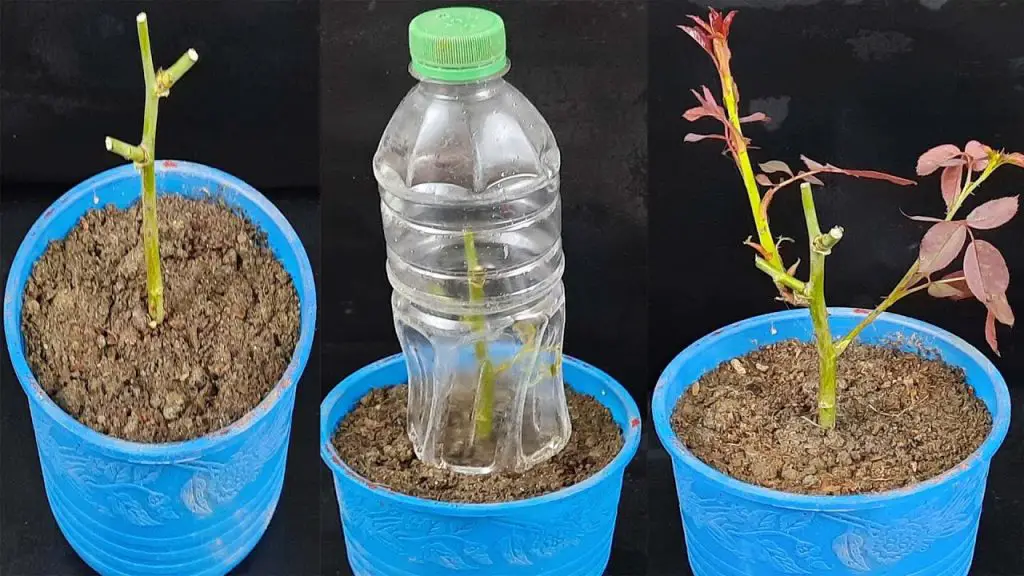
Step 5: Cover the Cutting with a Plastic Bottle
Now, take your plastic bottle (clear plastic works best) and carefully place it over the cutting. The bottle acts as a mini greenhouse, keeping the cutting warm and humid while protecting it from the outside environment.
- Remove the bottom of the bottle, leaving the top on as the cover.
- Place the bottle in a bright, indirect light location, away from direct sunlight that might overheat the cutting.
- Seal the bottle by pressing it gently into the soil to help maintain humidity. Ensure there’s some air circulation by leaving small openings if the bottle has a cap, or occasionally lifting it for a short time.
Step 6: Maintain the Cutting
- Check the cutting daily to ensure it is staying moist, but not overly wet.
- Water the cutting if the soil feels dry, but be careful not to overwater, as this could lead to rot.
- Air the bottle once or twice a day for a few minutes to avoid mold or fungal growth.
Step 7: Wait for Roots to Develop
Over the next 3-4 weeks, the rose cutting should begin to develop roots. You can gently tug on the cutting to feel if there’s resistance, which is a sign that the roots have formed.
- Keep the bottle on the cutting for about 4 weeks or until you see signs of healthy root growth.
- Once you notice roots, remove the bottle to allow the cutting to adjust to the normal humidity levels.
Step 8: Transplant Your New Rose Plant
Once your rose cutting has developed a healthy root system, it’s time to transplant it into a larger pot or directly into the garden.
- Harden off the new plant by gradually exposing it to outdoor conditions over a few days before planting it in full sun.
Tips for Success:
- Choose a healthy parent plant: The quality of the parent plant will directly affect the success of the cutting.
- Be patient: Rooting can take a few weeks, so give the cutting time to establish roots.
- Provide indirect sunlight: Avoid placing the cutting in direct sunlight to prevent overheating under the bottle.
- Avoid overwatering: Too much water can cause the cutting to rot, so ensure the soil is moist but not soggy.
Conclusion
Using a plastic bottle to cover your rose cutting is a simple and effective method for propagating roses at home. This method creates the ideal conditions for root development and ensures the cutting thrives until it’s ready to be planted in the garden. Whether you’re a beginner or an experienced gardener, this technique can help you grow beautiful roses from cuttings without much effort. So, grab a cutting, a bottle, and start your rose propagation journey today!


