Growing roses from cuttings is one of the most rewarding and cost-effective ways to propagate these beautiful plants. Using a plastic bottle covering can significantly improve the chances of successful rooting, creating a greenhouse effect that helps the cutting thrive in a controlled environment. This simple method not only saves money on purchasing new rose plants but also allows you to propagate your favorite varieties at home.
In this article, we’ll walk you through the step-by-step process of growing roses from cuttings with a plastic bottle to increase your success rate.
Why Grow Roses from Cuttings?
- Cost-effective: Growing roses from cuttings saves money, as you can propagate your existing rose plants.
- Preserve desired traits: When you grow roses from cuttings, the new plants will retain all the desirable traits of the parent plant, such as flower color, scent, and disease resistance.
- Increased success rate: The bottle method helps maintain humidity and warmth around the cutting, encouraging faster and more reliable root growth.
Materials Needed:
- Healthy Rose Cutting: Select a strong, disease-free cutting from your rose plant.
- Sharp Knife or Pruning Shears: For clean cuts.
- Plastic Bottle: A clear plastic bottle will work best, as it allows sunlight to reach the cutting.
- Well-draining Potting Mix: Use a mix that retains moisture without becoming soggy.
- Small Pot or Container: For planting the cutting.
- Rooting Hormone (optional): Helps stimulate root growth.
- Water: For keeping the soil moist.
Step-by-Step Guide: How to Grow Roses from Cuttings Using a Bottle
Step 1: Take a Healthy Rose Cutting
- Select a healthy rose: Choose a mature, healthy rose bush that is free from disease or pests. Ideally, take a cutting during the late spring or early summer when the plant is actively growing.
- Cut the stem: Use sharp pruning shears or a knife to cut a 6-8 inch piece of stem. Make sure the cutting is from the current season’s growth. The cutting should have at least 3-4 nodes (the bumps where leaves emerge) to increase the chance of successful rooting.
- Remove excess leaves: Trim any leaves from the bottom half of the cutting, leaving a few leaves at the top to help the cutting absorb sunlight.
Step 2: Prepare the Cutting
- Dip in rooting hormone (optional): For a better success rate, dip the cut end of the rose cutting into rooting hormone. This will encourage the growth of healthy roots.
- Trim the cutting: Ensure that the bottom of the cutting is just below a node. If any flower buds are present, pinch them off to focus the energy on root development.
Step 3: Prepare the Potting Mix
- Choose a well-draining pot: Fill a small pot or container with a well-draining potting mix. You can use a mix of sand, peat moss, and perlite to create an ideal medium for rooting.
- Moisten the soil: Water the soil lightly to keep it moist but not waterlogged. The soil should be damp to the touch, but not soaked.
Step 4: Insert the Rose Cutting
- Make a hole in the soil: Use a pencil or stick to make a hole in the soil where you’ll insert the cutting.
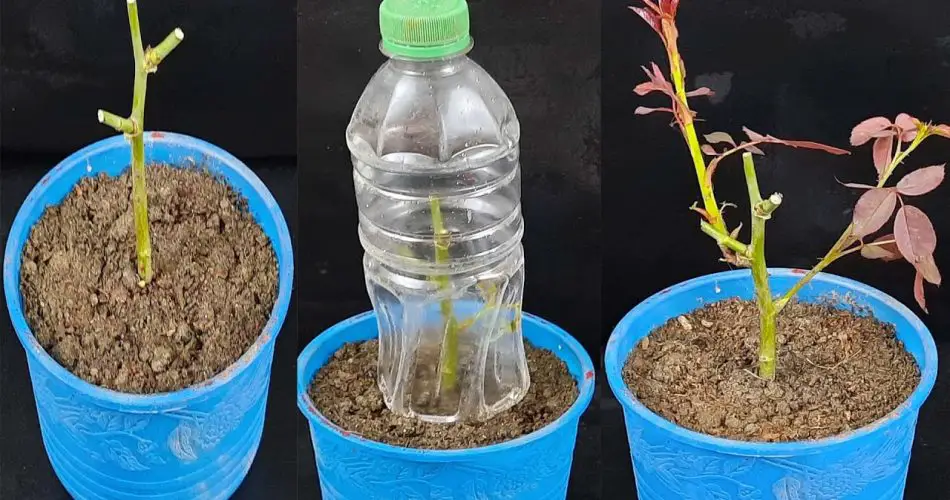
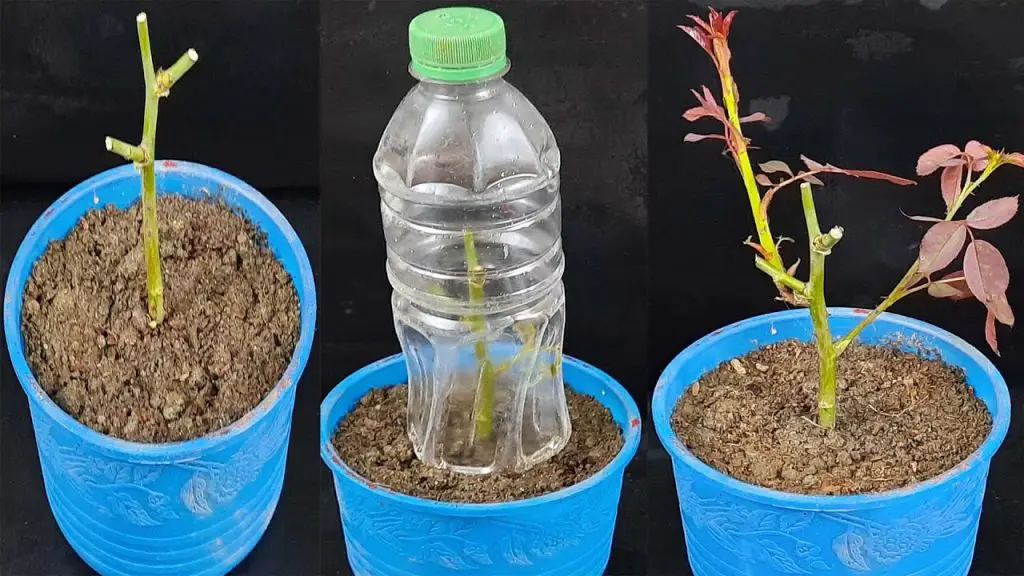
- Place the cutting in the soil: Insert the bottom end of the rose cutting into the hole, burying it about 2 inches deep. Gently firm the soil around the cutting to hold it in place.
Step 5: Cover the Cutting with a Plastic Bottle
- Prepare the bottle: Take a clear plastic bottle and cut off the bottom. If the bottle is too tall, you can trim it to a suitable height.
- Place the bottle over the cutting: Place the plastic bottle over the cutting to create a mini greenhouse. This will trap moisture and warmth, creating an ideal environment for root growth.
- Secure the bottle: If needed, use a rubber band or string to secure the bottle to the pot. Ensure that the bottle is stable and doesn’t shift or fall over.
Step 6: Maintain the Cutting
- Water regularly: Keep the soil moist, but not overly wet. The bottle covering will help maintain humidity around the cutting, but you should still monitor the moisture level.
- Provide indirect sunlight: Place the potted cutting in a location with bright, indirect sunlight. Avoid direct sunlight, which can overheat the cutting inside the bottle.
- Ventilate the cutting: After a few days, remove the bottle for a short time to ventilate and prevent mold. Gradually increase the ventilation time until the cutting is acclimated to the open air.
Step 7: Check for Root Growth
- Wait for root development: After about 3-4 weeks, gently check the bottom of the pot for signs of root growth. You can lightly tug on the cutting to see if it resists, which indicates that roots are forming.
- Remove the bottle: Once you see new growth or strong roots, you can remove the bottle and allow the cutting to continue growing in the pot.
Additional Tips for Success
- Humidity is key: Keeping the cutting in a humid environment is essential. The plastic bottle will help retain moisture, which is crucial for successful rooting.
- Temperature: Roses prefer temperatures between 65°F and 75°F (18°C to 24°C) for optimal growth. Make sure the cutting is kept in a warm location, but not in direct sunlight.
- Pruning: As the new rose plant begins to grow, prune it regularly to encourage branching and a fuller plant.
- Transplanting: Once the rose cutting has developed strong roots, you can transplant it into a larger pot or directly into the garden.
Conclusion
Growing roses from cuttings using a plastic bottle as a covering is a simple yet effective method for propagating beautiful rose plants. The bottle creates a humid environment that helps the cutting root successfully, resulting in a healthy new rose plant. With patience, proper care, and the right conditions, you can easily grow your own roses from cuttings and enjoy the satisfaction of seeing them thrive in your garden. Happy gardening!


