Grafting is a popular technique used to propagate fruit trees, and guava is no exception. If you want to grow healthy, high-yielding guava trees, grafting is one of the most effective methods. By grafting, you can combine the best qualities of two different guava varieties, such as a strong rootstock and a fruit-bearing scion, to create a tree that produces better fruit and is more disease-resistant.
In this article, we will guide you through the best way to graft a guava tree using simple, effective methods to ensure success.
Why Graft a Guava Tree?
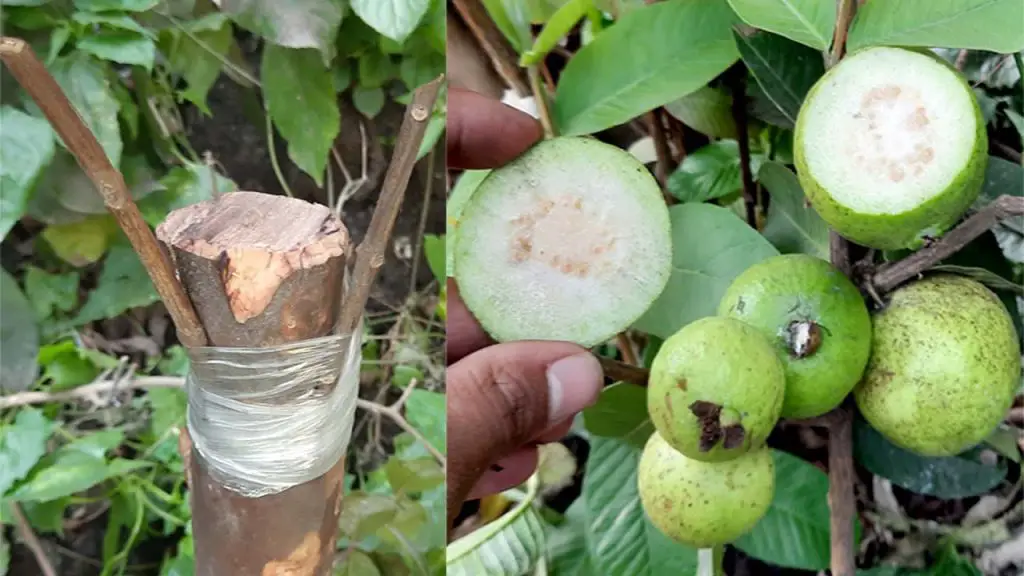
- Improved fruit quality: Grafting allows you to select a high-quality scion (the top part of the tree) with desirable fruit characteristics, such as better flavor, size, or sweetness.
- Faster fruiting: Grafted guava trees tend to bear fruit more quickly than those grown from seeds.
- Disease resistance: By choosing a strong rootstock, you can enhance the tree’s resistance to diseases and pests.
- Compatibility with different climates: Some rootstocks are more adaptable to specific soil conditions, allowing you to grow guava trees in areas where they might not naturally thrive.
Materials Needed for Grafting Guava Trees:
- Healthy Guava Scion (a cutting from a mature, fruit-bearing guava tree)
- Guava Rootstock (a young, healthy guava tree or root cutting)
- Sharp Knife or Grafting Tool (to make precise cuts)
- Grafting Tape or Plastic Wrap (to secure the graft)
- Grafting Wax or Sealant (to seal the graft and prevent moisture loss)
- Sterilizing Solution (to clean your tools before grafting)
- Rooting Hormone (optional, to promote root growth)
- Rubber Band or String (for securing the graft tightly)
Step-by-Step Guide: Best Way to Graft a Guava Tree
Step 1: Choose the Right Scion and Rootstock
- Select a healthy scion: Choose a young, healthy shoot from a mature guava tree. The scion should be about 6-8 inches long with active buds and no signs of disease.
- Select a healthy rootstock: The rootstock should be a young guava tree or root cutting of the same species. It should be disease-free and have a healthy root system.
Step 2: Prepare the Rootstock
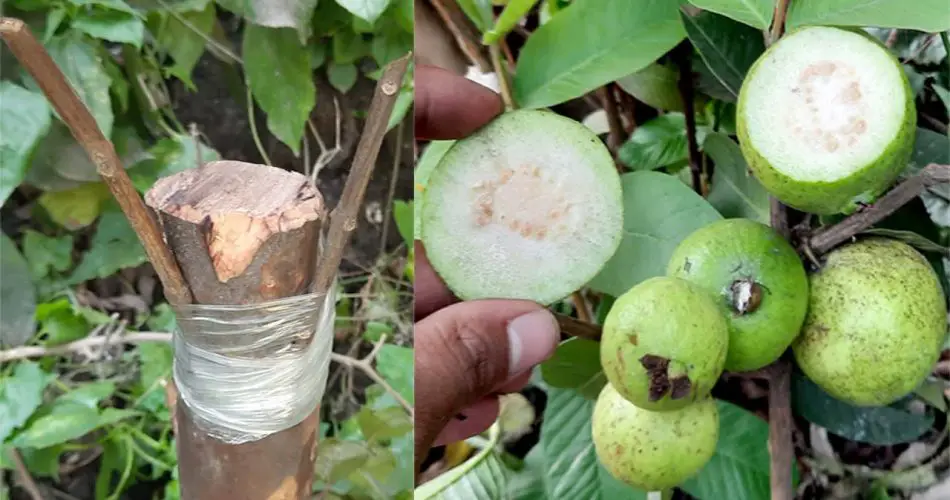
- Cut the rootstock: Use a sharp knife to cut the rootstock about 6-8 inches above the ground. Make a clean, flat cut to expose fresh tissue where the scion will be attached.
- Prepare the cut surface: For the best grafting results, make sure the cut surface of the rootstock is smooth and even. If needed, trim any excess growth around the base.
Step 3: Prepare the Scion
- Cut the scion: Make a clean diagonal cut on the base of the scion, about 2-3 inches long. Ensure the cut is smooth and free of any bruising or damage.
- Shape the scion: The cut should match the cut on the rootstock. To create a cleft graft, make a V-shaped cut at the bottom of the scion, ensuring it fits perfectly into the rootstock.
Step 4: Grafting Process
- Join the scion and rootstock: Carefully insert the scion into the cut area of the rootstock. The cambium layers (the thin green tissue beneath the bark) of both parts should align perfectly for the graft to take.
- Secure the graft: Use grafting tape or plastic wrap to tightly secure the scion and rootstock together. Make sure that the union is snug and no air or moisture can enter.
- Seal the graft: Apply grafting wax or a similar sealant over the cut area to prevent moisture loss and infection. Ensure the entire grafted area is sealed.
Step 5: Care for the Grafted Guava Tree
- Maintain humidity: To create a humid environment, cover the graft with a plastic bag or a clear plastic dome. This will help keep the graft area moist and encourage faster healing.
- Place in indirect sunlight: Keep the grafted tree in a warm location with indirect sunlight. Avoid direct sun exposure, which can dry out the graft.
- Water carefully: Keep the grafted tree in a location with adequate moisture but not overly wet soil. Overwatering can lead to root rot, while too little water can stunt growth.
- Check the grafting progress: After about 3-4 weeks, check the graft for signs of success. If the scion starts to show new growth, it indicates the graft has taken successfully.
Step 6: Remove the Grafting Tape
- Check for new growth: Once you see healthy new growth on the scion and the graft union is strong, you can begin to remove the grafting tape. This is typically around 4-6 weeks after grafting.
- Support the plant: As the guava tree continues to grow, you may need to provide some support, such as a stake or trellis, especially if the tree starts to grow tall.
Additional Tips for Successful Guava Tree Grafting:
- Timing: The best time for grafting guava trees is during the early growing season, usually in spring or early summer, when the plants are actively growing.
- Use clean tools: Always sterilize your grafting tools to prevent the spread of disease and ensure the grafting process is successful.
- Monitor for pests: Check for common pests such as aphids, mealybugs, and scale insects, which can damage the grafted area and hinder the tree’s growth.
- Be patient: Grafting can take time, so be patient and wait for the scion and rootstock to successfully join before expecting new growth.
Why Grafting is the Best Method for Guava Trees
- Faster fruiting: Grafted guava trees typically bear fruit much faster than those grown from seed, often within 1-2 years.
- Better fruit quality: By grafting, you can select scions from guava trees known for producing high-quality fruit with desirable traits, such as size, sweetness, and resistance to disease.
- Disease resistance: The rootstock can be chosen for disease resistance, ensuring the tree grows healthy and produces more fruit in the long term.
Conclusion
Grafting is one of the most effective methods to propagate guava trees and ensure that they produce high-quality, healthy fruit. By following the steps outlined above, you can successfully graft a guava tree and enjoy better yields, faster fruiting, and increased disease resistance. With patience, attention to detail, and the right techniques, you can grow a thriving guava tree in your garden. Happy grafting!


