If you love Christmas trees and want to create your own beautiful forest of festive greenery, learning how to propagate them from cuttings is a fantastic skill to master. Not only does it allow you to grow your very own Christmas tree, but it can also be a rewarding way to connect with nature and bring the holiday spirit to your garden year-round. In this guide, we will cover the process of growing Christmas trees from cuttings and offer some expert tips on Christmas tree propagation.
Why Grow Christmas Trees from Cuttings?
Growing Christmas trees from cuttings is an excellent way to propagate evergreens like fir, spruce, and pine. Instead of buying a tree each year, you can grow a new one from the cutting of an existing tree, ensuring that you have a sustainable source of festive trees for the future. Additionally, growing Christmas trees from cuttings allows you to replicate the exact characteristics of the parent tree, such as shape and size.
Some benefits of growing Christmas trees from cuttings include:
- Cost savings over purchasing a mature tree.
- The ability to replicate the same variety of Christmas tree year after year.
- A fun, sustainable gardening project that can be enjoyed with friends and family.
Materials You Will Need
To get started with Christmas tree propagation, gather the following materials:
- Healthy Christmas tree from which you can take cuttings (e.g., Douglas fir, Norway spruce, Blue spruce, etc.)
- Sharp pruning shears or garden scissors
- Rooting hormone (optional but recommended for better root growth)
- Clean pots or containers with drainage holes
- Well-draining potting mix
- Plastic bag or clear plastic cover (for humidity control)
- Water for soaking and maintaining moisture
- Spray bottle for misting
Step-by-Step Guide to Growing Christmas Trees from Cuttings
Step 1: Choose the Right Parent Tree
Before you begin, it’s important to select a healthy parent tree. Look for a tree that is free from disease or pests and has a good shape. The best time to take cuttings from a Christmas tree is during the late spring to early summer, when the tree is actively growing and the branches are flexible.
Step 2: Select the Cutting
Once you’ve chosen your parent tree, you will need to cut a healthy branch for propagation. The branch should be about 4–6 inches long and taken from the current season’s growth. Look for branches that are firm, non-woody, and healthy, as these will root more successfully.
When cutting, use sharp pruning shears to avoid damaging the tree. Cut just below a leaf node (where the needles meet the stem) to ensure the cutting has enough surface area to root. You can take multiple cuttings to increase your chances of success.
Step 3: Prepare the Cutting
Once you have the cutting, remove any needles from the lower 2 inches of the stem. This will help the cutting focus its energy on growing roots rather than supporting unnecessary foliage.
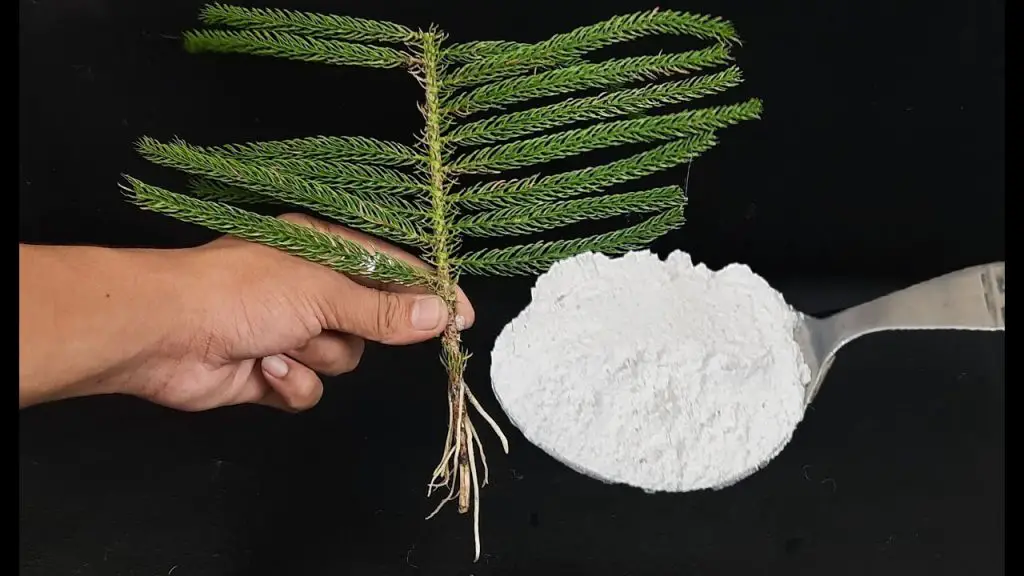
At this point, you can also dip the cut end of the stem in rooting hormone, which helps stimulate root growth. While rooting hormone is optional, it greatly increases the chances of successful propagation.
Step 4: Prepare the Pot and Soil
Fill a small pot or container with well-draining potting mix. You can use a combination of perlite and peat moss or a specialized potting mix designed for cuttings. The key is to ensure the soil drains well to prevent waterlogging, which could lead to root rot.
Moisten the soil lightly before inserting the cutting. The soil should be damp, but not soaking wet.
Step 5: Insert the Cutting into the Soil
Insert the prepared cutting into the soil, burying the lower part of the stem where you removed the needles. You can insert the cutting about 2–3 inches deep into the soil. Make sure that the cutting is stable and upright.
To ensure the cutting stays in place, you can gently press the soil around it. You can also plant multiple cuttings in the same pot if you’re propagating more than one tree.
Step 6: Create a Humid Environment
To promote successful rooting, you will need to maintain a humid environment around the cutting. Cover the pot with a plastic bag or a clear plastic cover to trap moisture. Be sure to leave the bag slightly open or punch a few small holes to allow some air circulation. This will create a mini-greenhouse effect, keeping the cutting moist while encouraging root development.
Alternatively, you can use a propagation tray with a clear lid to keep the humidity levels high.
Step 7: Care for the Cutting
Once your cutting is in place, it’s important to maintain the right conditions for it to thrive. Follow these care tips:
- Keep the cutting in a shaded area with bright, indirect sunlight. Avoid direct sunlight, which can dry out the cutting.
- Water regularly, but make sure the soil doesn’t become too soggy. Mist the cutting with a spray bottle to maintain moisture in the air.
- Check the cutting periodically for signs of root development. This can take several weeks to a few months, depending on the tree species and environmental conditions.
- Maintain the humidity by keeping the plastic covering in place. If it starts to dry out, lightly water the soil and mist the cutting again.
Step 8: Transplanting the Cutting
After several weeks or months, you will start to see roots developing on your cutting. You can check by gently pulling on the cutting to feel for resistance, which indicates the roots are growing.
Once a good root system has formed, you can carefully transplant the cutting into a larger pot or directly into the ground, if you live in a suitable climate for Christmas tree growth. Be sure to handle the cutting gently to avoid damaging the roots.
Step 9: Continue Care for the New Tree
Now that your Christmas tree cutting has rooted and is ready to be planted in the ground or in a larger pot, it’s important to continue providing proper care:
- Fertilize the tree with a balanced slow-release fertilizer to encourage healthy growth.
- Water regularly, especially during dry spells.
- Prune the tree as it grows to ensure a healthy shape and structure, removing any dead or damaged branches.
Tips for Success
- Choose a suitable tree variety: Not all Christmas tree species propagate equally well from cuttings. Douglas fir, Blue spruce, and Fraser fir are among the best for propagation, but be sure to research the specific needs of the variety you’re using.
- Avoid taking cuttings from trees that are too old or diseased. Healthy, younger branches are most likely to root successfully.
- Be patient: Rooting and growing a Christmas tree from a cutting takes time, so don’t get discouraged if it doesn’t happen overnight.
Conclusion
Growing Christmas trees from cuttings is a rewarding way to create your own holiday trees and start a sustainable tradition. By following the steps outlined in this guide and providing the right care and conditions, you can propagate your own Christmas tree with success. Not only will you have a beautiful tree for Christmas, but you’ll also enjoy the satisfaction of watching your tree grow from a small cutting into a towering symbol of the season. Happy propagating!


