Coconut trees are not only a symbol of tropical beauty but also a source of delicious fruit and nourishing water. If you’ve ever wanted to grow your own coconut tree, you’re in luck! Growing a coconut tree from a baby coconut is surprisingly easy and doesn’t require a large garden or a tropical climate. Whether you live in a warm area or not, you can grow your own coconut tree at home with a few simple steps. Here’s how you can do it:
Why Grow a Coconut Tree from a Baby Coconut?
Growing a coconut tree from a baby coconut (the immature green coconut) is an effective and exciting way to start your own tropical tree. Not only does it require minimal effort, but it can also be a fun gardening project for beginners. Here are some benefits of growing your coconut tree from a baby coconut:
- Easy to grow: You don’t need any special skills or gardening knowledge.
- Quick results: You’ll see your coconut tree begin to sprout in a matter of weeks.
- Tropical appeal: A coconut tree adds a beautiful, exotic look to your garden or home.
Materials Needed
Before you begin, make sure you have these materials on hand:
- A fresh baby coconut (preferably still in its husk)
- A container or pot (preferably large enough to accommodate the roots)
- Well-draining soil (a mix of compost, sand, and loamy soil works best)
- Water (keep the soil moist, but not waterlogged)
- A sunny location (coconut trees love bright sunlight)
- A sharp knife (for preparing the coconut)
Step-by-Step Guide to Growing a Coconut Tree from a Baby Coconut
Step 1: Choose the Right Baby Coconut
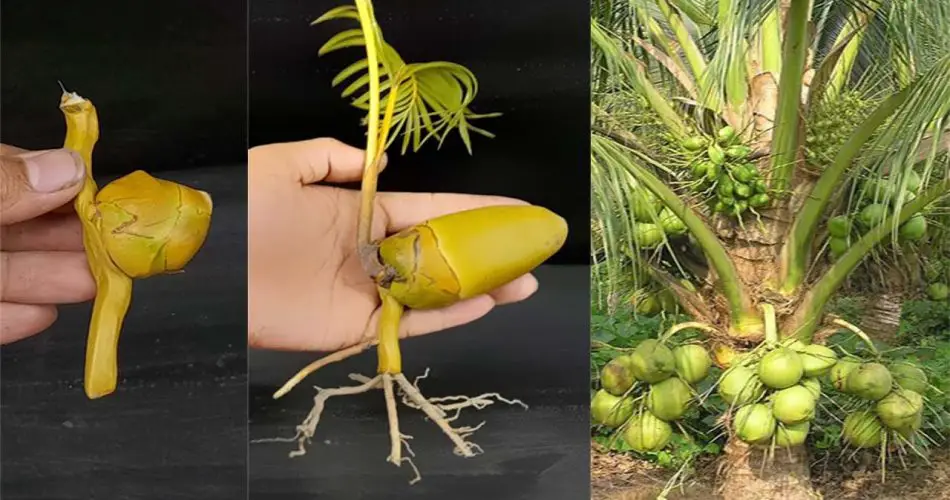
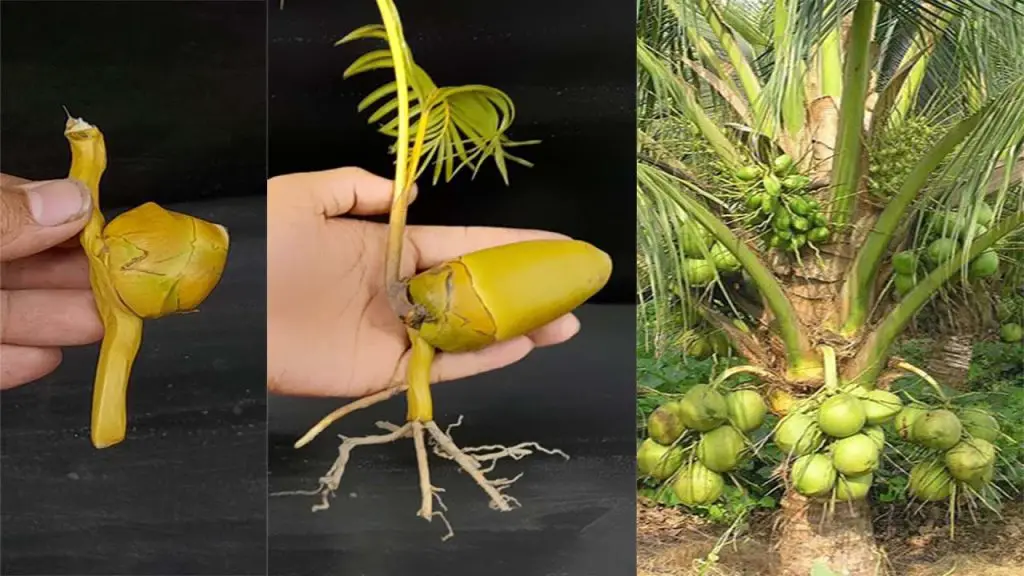
The first step in growing a coconut tree is selecting a healthy baby coconut. You want a coconut that is still green and has not been dried out. The coconut should be fresh and have no cracks or signs of damage. Look for coconuts that are still filled with water; these are the best candidates for successful growth.
Step 2: Prepare the Coconut
Once you’ve selected your baby coconut, you need to prepare it for planting. Here’s how:
- Drain the coconut: Before planting, drain any remaining water from the coconut. You can do this by poking a hole in one of the eyes (the three small brown circles on the coconut) and draining the water into a container.
- Soak the coconut: Once drained, soak the coconut in warm water for 2-3 days. This helps to soften the husk and promotes germination.
- Position the coconut: The baby coconut has three eyes, one of which will become the root. Position the coconut so that the flat, hairy end is facing down while the pointy side is facing up.
Step 3: Prepare the Potting Container
To grow your coconut tree, choose a large container with plenty of drainage holes. A large plastic or ceramic pot is ideal, as it allows room for the coconut’s roots to spread. Fill the container with well-draining soil, such as a mixture of compost, sand, and loamy soil. The soil should be rich in nutrients to support the coconut as it grows.
Step 4: Plant the Coconut
Place the baby coconut in the center of the container, ensuring the pointed end is facing upwards and the flat, hairy side is touching the soil. Cover about one-third of the coconut with the soil. It’s important not to bury the entire coconut; it should still be partially visible above the soil. Water the soil lightly after planting, ensuring that it is moist but not soaked.
Step 5: Provide the Right Environment
Coconut trees require a warm and sunny environment to thrive. Place the pot in a sunny location that receives direct sunlight for at least 6-8 hours a day. If you’re growing the coconut indoors, make sure to place it near a south-facing window or under a grow light. Maintain the temperature between 70°F to 85°F (21°C to 29°C) to help the coconut germinate.
Step 6: Water and Maintain Moisture
After planting the coconut, make sure to water the soil regularly. Coconut trees like moist soil, but it’s crucial that the soil is well-draining to prevent the coconut from rotting. Water the soil every 2-3 days, ensuring it stays consistently moist but not waterlogged. Overwatering can harm the growth of your coconut tree.
Step 7: Wait for Germination
It may take 2 to 4 months for the baby coconut to begin sprouting. Be patient, as this process can take some time. After a few weeks, you should notice the coconut’s husk begin to crack open. Eventually, a shoot will start to emerge from the top of the coconut, followed by roots from the bottom. Once the shoot reaches a few inches in height, you can begin to move the plant to a larger pot or even into the ground, if you live in a suitable climate.
Step 8: Transplanting
Once the coconut has sprouted and has a few roots and leaves, you can transplant it into a larger pot or your garden. If you’re planting it in the garden, make sure it’s in a location with full sunlight and well-draining soil. Coconut trees need a lot of space to grow, so ensure they have plenty of room to spread their roots.
Tips for Successful Coconut Growth
- Sunlight is key: Coconut trees love sunlight. Make sure they receive at least 6 hours of direct sunlight each day.
- Water regularly: Keep the soil moist but not soggy to promote healthy growth.
- Be patient: It can take a few months for your coconut to germinate, so don’t be discouraged if you don’t see immediate results.
- Fertilize occasionally: Coconut trees benefit from occasional feeding with a balanced, organic fertilizer to support their growth.
Conclusion
Growing a coconut tree from a baby coconut is an easy and rewarding process. By following the steps outlined above, you can enjoy watching your coconut tree grow into a beautiful and tropical addition to your home or garden. Whether you’re growing it in a pot on a balcony or directly in the ground, the key to success lies in providing your coconut with plenty of sunlight, moisture, and space to grow. Happy gardening! 🌴


