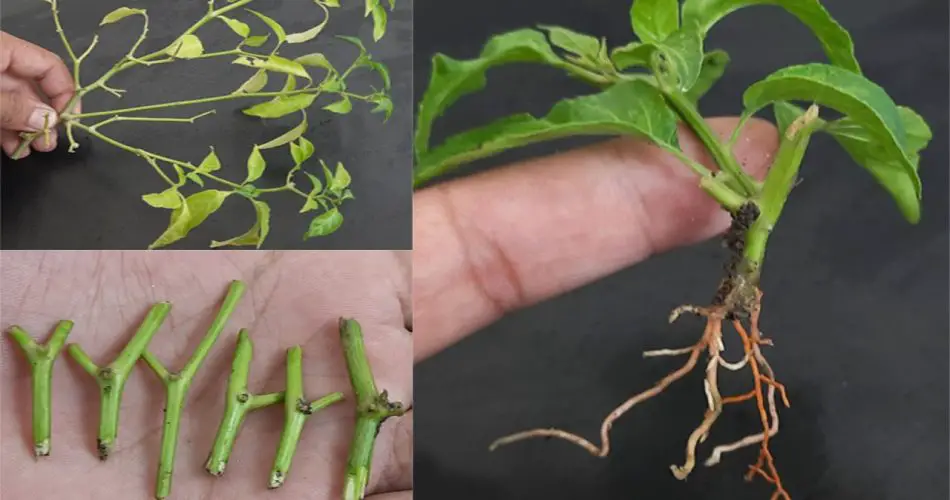
Growing a chilli plant from a cutting is a simple and effective way to propagate this spicy and flavorful plant. By using a cutting, you can quickly grow a chilli plant that is just as productive as one grown from seeds. In this article, we’ll share easy techniques that will help you grow a chilli plant from cuttings successfully.

Why Grow Chilli Plants from Cuttings?
Growing chilli plants from cuttings offers several benefits:
- Faster Growth: Cuttings are taken from a mature plant, so they already have established growth points, which means they grow faster than plants from seeds.
- Genetic Consistency: Growing from a cutting ensures that the new plant will have the same characteristics as the parent plant, including the flavor, spiciness, and size of the chillies.
- Easy for Beginners: Propagating from cuttings is often easier than starting from seeds, especially for beginners.
Materials Needed:
- Healthy Chilli plant: Choose a healthy parent plant that is free from pests and diseases.
- Sharp knife or pruning shears: For making a clean cut.
- Rooting hormone (optional): This can help stimulate faster root growth, though it’s not necessary.
- Small pot: With drainage holes to ensure proper water drainage.
- Well-draining potting mix: You can use a mixture of sand, perlite, and peat moss for good drainage.
- Clear plastic bag or plastic wrap: To create a humid environment for the cutting.
Step-by-Step Guide to Growing Chilli Plants from Cuttings
Step 1: Choose the Right Cutting
- Select a healthy parent plant: Choose a chilli plant that is vigorous and free from diseases or pests. The cutting should come from a mature branch with no signs of stress or damage.
- Cut a healthy stem: Using a sharp knife or pruning shears, cut a 4 to 6-inch long section of the stem. The cutting should be taken from a semi-hardwood stem (not from the soft new growth but not too woody either).
- Make a clean cut: The cut should be made just below a node (where leaves and branches emerge). This will allow the plant to develop roots from the node.
Step 2: Prepare the Cutting
- Remove excess leaves: Strip away the lower leaves from the cutting, leaving just a few leaves at the top. This helps the cutting focus its energy on root development instead of supporting unnecessary leaves.
- Optional: Use rooting hormone: If you have rooting hormone, dip the cut end of the chilli cutting into the powder. This can help speed up root development, but it’s not mandatory.
Step 3: Plant the Cutting
- Prepare a pot: Fill a small pot with well-draining potting mix. A good mix could include perlite, sand, and peat moss for proper aeration and drainage.
- Insert the cutting: Make a small hole in the potting mix using a pencil or stick, then insert the cut end of the chilli cutting into the soil. Ensure that the node, where roots will emerge, is below the surface of the soil.
- Firm the soil: Gently press the soil around the cutting to ensure it is firmly in place.
Step 4: Create a Humid Environment
- Cover with plastic: To create a humid environment, cover the cutting with a clear plastic bag or a plastic dome. This helps retain moisture around the cutting, which is crucial for root development.
- Place in a warm location: Keep the pot in a warm location with indirect sunlight. A temperature range of 70°F to 80°F (21°C to 27°C) is ideal for root growth.
- Monitor moisture: Ensure the soil remains moist but not soggy. Water lightly as needed, and make sure the cutting doesn’t get too wet, which could lead to rot.
Step 5: Rooting and Transplanting
- Check for roots: After about 2-3 weeks, check the cutting by gently tugging on it. If you feel resistance, the cutting has developed roots.
- Remove the plastic covering: Once the roots have formed, remove the plastic cover to allow the cutting to acclimate to the surrounding air.
- Transplant the rooted cutting: After the cutting has developed a solid root system, you can transplant it into a larger pot or directly into your garden. Choose a spot with full sun and well-draining soil for optimal growth.
Tips for Success:
- Water regularly but carefully: Water the cutting regularly, but don’t let it sit in water. Overwatering can cause the cutting to rot.
- Provide warmth and light: Make sure the cutting receives indirect sunlight and warmth, which speeds up the rooting process.
- Avoid direct sun exposure: When the cutting is first planted, avoid direct sunlight as it can dry out the cutting. Gradually introduce it to more sunlight as it grows stronger.
Conclusion
Growing a chilli plant from cuttings is a simple and effective way to expand your garden and enjoy a steady supply of fresh chillies. With the right materials and techniques, you can quickly propagate a chilli plant that will grow into a healthy, fruit-bearing tree. By following these easy steps, you’ll have your very own chilli plants growing in no time. Happy gardening!


