If you’re looking for a unique and durable way to display your plants, why not try making your own flower pots using sand molds and cement? This DIY project is simple, cost-effective, and allows you to create custom flower pots that can be tailored to fit any space. Whether you’re a seasoned gardener or a crafting enthusiast, making flower pots from cement and sand is a fun way to add a personalized touch to your garden or home decor. Here’s how you can get started on your own cement flower pot creation.

Why Make Flower Pots from Sand and Cement?
Flower pots made from cement and sand molds are incredibly sturdy and long-lasting. Unlike plastic pots that can crack or fade over time, cement pots provide a rustic, industrial, or modern look that fits well in various home styles. Plus, they’re customizable in shape, size, and texture. The best part? You can make your flower pots for a fraction of the cost of buying them at a store!
Materials Needed
To get started, gather the following materials for this DIY flower pot project:
- Cement mix (available at most hardware stores)
- Sand (for making molds)
- Water (to mix with the cement)
- Mixing container (bucket or large bowl)
- Mold (an old pot, a bowl, or even a sandcastle mold can work)
- Plastic sheet or plastic bag (to line the mold, making removal easier)
- Rubber gloves (for safety)
- Trowel or small shovel (for mixing)
- Acrylic paint (optional, for decoration)
- Drill with a small bit (for drainage holes)
Step-by-Step Guide to Making Cement Flower Pots
Step 1: Prepare the Mold
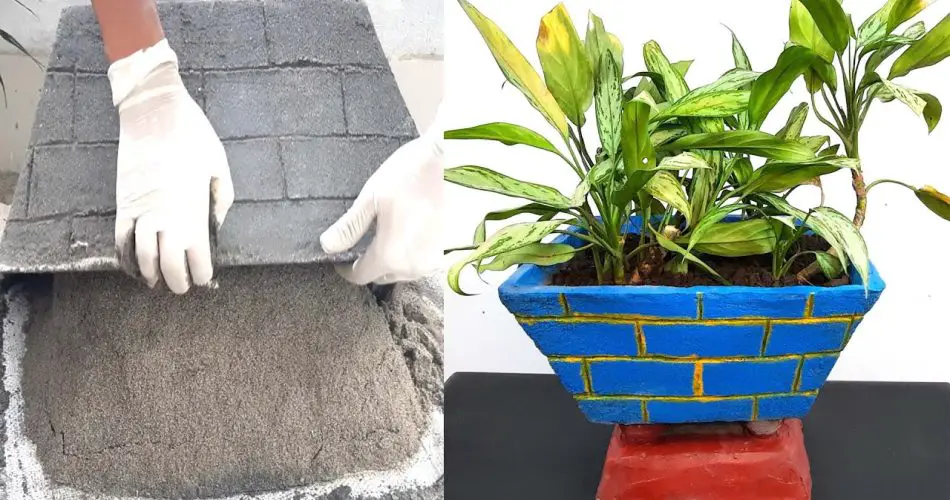
The first step in making your cement flower pot is preparing the mold. You can use any container that has the desired shape for your pot. Some popular choices include old plastic flower pots, metal bowls, or even sand molds for a more creative touch. If you’re using sand molds, create a base by piling the sand into the shape you want and forming a hollow center for the cement.
- If you’re using a plastic mold, line the inside with a plastic sheet or plastic bag. This will make removing the hardened cement easier later on.
- For sand molds, build up your sand mound and then compact it to create the hollow center where the cement will go.
Step 2: Mix the Cement
Once your mold is prepared, it’s time to mix the cement. In your mixing container, combine the cement mix with water according to the instructions on the bag. Usually, you’ll want a thick, pourable consistency—not too runny or too dry. Stir well with a trowel or small shovel to ensure an even mixture.
- If you’re using a sand mold, mix enough cement to fill the mold to the desired height.
- If you’re making a single pot, use a medium-sized mixing container. For multiple pots, adjust the cement quantities as needed.
Step 3: Pour the Cement into the Mold
Now it’s time to pour the cement mixture into the mold. If you’re using a sand mold, gently pack the cement into the hollow area created by the sand. If you’re using a plastic container mold, simply pour the cement into the prepared mold.
- For sand molds, ensure the cement is packed tightly to prevent air bubbles. Tap the sides gently to settle the mixture.
- Leave some space at the top of the mold to account for any overflow while it sets.
Step 4: Let the Cement Set
Allow the cement to dry for at least 24 hours. The exact drying time may vary depending on the type of cement used and the size of the pot, so check the manufacturer’s instructions for more details.
- Tip: Keep the cement in a cool, dry place while it sets, and avoid disturbing the mold during this time.
Step 5: Demold the Pot
After the cement has fully hardened, it’s time to remove the mold. If you used a plastic mold or plastic sheet, carefully peel it away from the hardened cement pot. If you used sand molds, gently brush away the sand to reveal the cement pot underneath.
- If you notice rough edges or any imperfections, you can sand down the surface with a fine-grit sandpaper to smooth it out.
Step 6: Add Drainage Holes
Most flower pots need drainage holes to allow water to escape and prevent overwatering. If your cement pot doesn’t have any holes, use a drill with a small bit to create a few drainage holes at the bottom.
- For extra drainage, you can also add a layer of gravel or small stones at the bottom of your pot before adding soil.
Step 7: Decorate Your Pot (Optional)
Once your cement flower pot is set, you can leave it with its natural, rustic finish, or you can add a personal touch by decorating it with paint or other embellishments.
- Acrylic paints work great on cement surfaces. You can create beautiful patterns, floral designs, or even geometric shapes to match your decor.
- Alternatively, you can add a sealing spray to protect the finish and give it a glossy look.
Step 8: Plant Your Flowers or Plants
Now that your flower pot is ready, it’s time to add soil and plant your favorite flowers, herbs, or indoor plants. The cement flower pot will provide a sturdy and stylish home for your plants to grow.
- For smaller plants or herbs, consider planting succulents or cacti, which thrive in well-drained pots.
- If you’re using a larger pot, consider planting geraniums, petunias, or even vegetables like tomatoes or peppers.
Additional Tips for Making Sand and Cement Flower Pots
- If you’re working with sand molds, make sure the sand is compacted enough to create a stable form, or it may collapse while you pour in the cement.
- For a more textured look, try pressing different materials like leaves, stones, or fabric into the surface of the cement before it fully sets. This can create a beautiful, natural design.
- If you want to make hanging pots, you can insert metal hooks or twine into the cement while it’s still wet, or drill small holes after the pot has dried to thread a string through.
Conclusion
Making flower pots from sand molds and cement is an incredibly fun and creative way to personalize your gardening space. Not only will you have durable, custom pots for your plants, but you’ll also have a DIY project that adds a unique touch to your home or garden. Whether you’re a beginner or a seasoned crafter, this project offers endless possibilities for design and creativity. Try it out, and get ready to show off your new cement flower pots! 🌿🌸


