Mehndi, also known as henna (Lawsonia inermis), is a plant widely admired for its leaves, which are used to create intricate, beautiful designs on the skin. However, henna plants can also be grown at home, providing you with fresh leaves for DIY henna and a beautiful shrub to enhance your garden. Growing henna from cuttings is one of the easiest and most effective methods for propagating this plant. In this article, we’ll walk you through the steps on how to grow mehndi/henna from cuttings at home for a thriving, productive plant.
Why Grow Mehndi (Henna) at Home?
Before jumping into the growing process, let’s understand why you might want to grow mehndi at home:
- Fresh Henna Leaves: Growing your own henna plant gives you access to fresh leaves to make your own henna paste for body art, hair dyeing, or even for medicinal purposes.
- Ornamental Shrub: Mehndi plants grow into beautiful shrubs with lush green foliage, which can add an exotic touch to your garden or balcony.
- Easy to Care For: Henna plants are low-maintenance once established and can be grown indoors or outdoors, making them ideal for beginners.
How to Grow Mehndi (Henna) from Cuttings at Home: Step-by-Step Guide
Growing henna from cuttings is a simple and efficient way to propagate the plant. Here’s how you can do it:
1. Choose a Healthy Henna Plant for Cuttings
To start, you’ll need to select a healthy henna plant. Look for a mature plant with no signs of disease or pest damage. Choose a plant that’s at least 1-2 years old for the best results, as older plants tend to produce better cuttings.
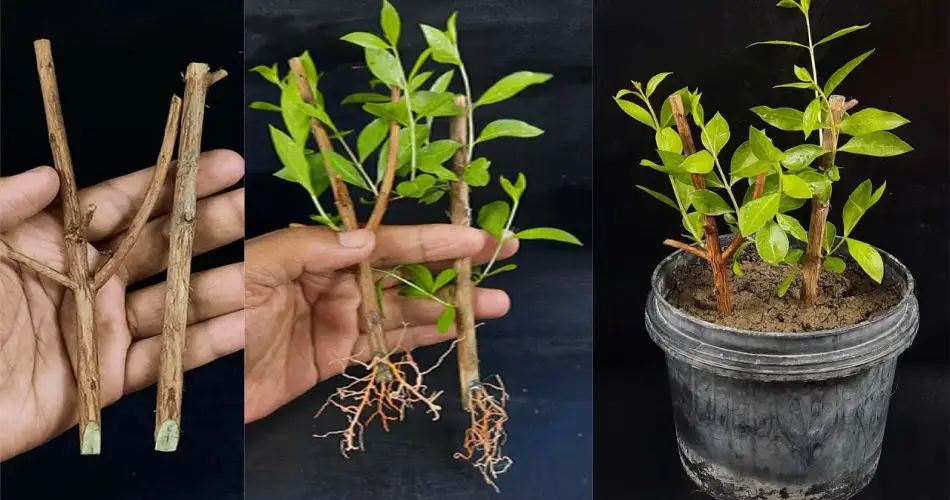
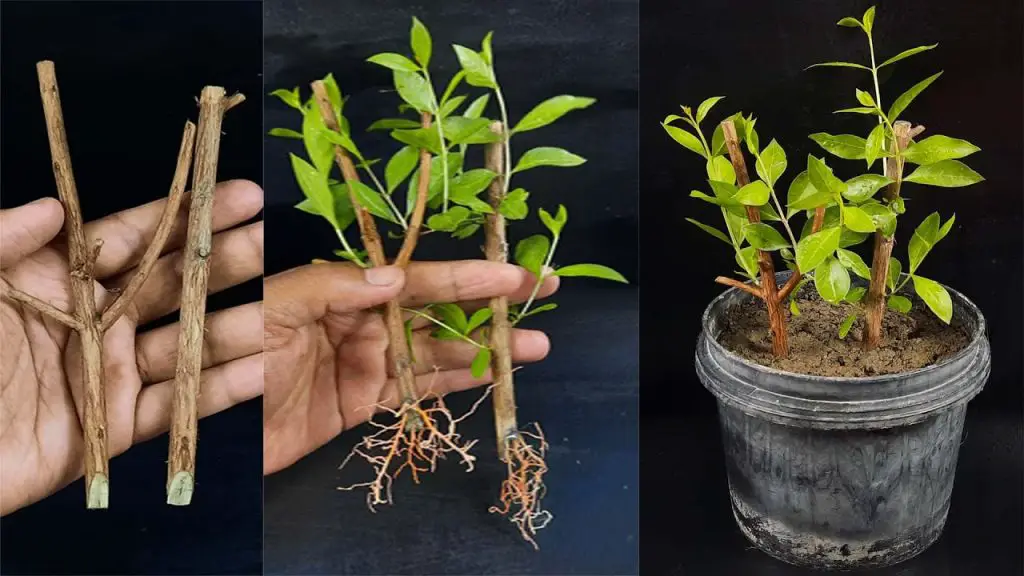
2. Take the Cuttings
- Select a Stem: Choose a semi-woody stem that is about 6-8 inches long and free from any diseases. The stem should be young but not too soft. It should have a few nodes (small raised bumps where leaves are attached) to encourage root growth.
- Cut the Stem: Using a sharp, sterile knife or pruning shears, cut the stem at a 45-degree angle just below a node. Make sure the cut is clean to avoid damaging the plant.
- Remove Leaves: Strip off the lower leaves of the cutting, leaving only a few at the top. This helps the cutting focus its energy on developing roots rather than sustaining leaves.
3. Prepare the Rooting Hormone (Optional)
To encourage faster rooting, you can dip the cut end of the henna cutting in rooting hormone. Rooting hormone is not strictly necessary, but it can increase the success rate of rooting, especially for woody stems.
4. Prepare the Potting Mix
- Well-Draining Soil: Henna plants prefer a well-draining potting mix that doesn’t retain too much moisture. You can use a standard cactus or succulent mix, or create your own by mixing perlite or sand with peat moss or coco coir.
- Container: Choose a small pot or container with good drainage holes to prevent waterlogging. A 4-6 inch pot works well for a single cutting.
5. Plant the Cutting
- Plant the Cutting: Insert the cutting into the potting mix about 2-3 inches deep. Gently press the soil around the cutting to secure it in place.
- Watering: Lightly water the soil, but avoid soaking it. The soil should be moist but not soggy. Overwatering can lead to rot. Ensure the pot has good drainage.
6. Create the Ideal Environment for Rooting
Henna cuttings need warmth and humidity to root successfully. Here’s how you can create the perfect environment for your cutting to grow:
- Temperature: Place the pot in a warm location with temperatures between 70-85°F (21-29°C). Henna plants thrive in warm climates, so warmth is essential for successful rooting.
- Humidity: To maintain humidity, cover the cutting with a clear plastic bag or a plastic dome. This will help prevent moisture loss while the cutting establishes roots. Make sure the plastic does not touch the cutting, and allow for some airflow to prevent mold or rot.
- Indirect Light: Place the pot in a bright, indirect light location. Avoid placing the cutting in direct sunlight, as it can cause the cutting to dry out too quickly. A north-facing window or an indoor grow light works well.
7. Care for the Cutting
- Watering: Check the soil regularly. Keep it slightly moist but not soaked. Water the cutting once the soil feels dry to the touch (but don’t overwater).
- Ventilation: If you’re using a plastic cover, remove it occasionally to allow air to circulate. This helps prevent mold and encourages healthy root growth.
- Patience: It can take anywhere from 3-6 weeks for the cutting to develop roots. You can check for root growth by gently pulling on the cutting. If you feel resistance, that means the roots are starting to form.
8. Transplant the Rooted Cutting
Once the cutting has established roots, you can transplant it into a larger pot or directly into the ground (if you live in a warm climate). Make sure to carefully remove the cutting from the pot and gently separate the roots from the soil.
- Planting in the Ground: If you live in a tropical or subtropical climate, you can plant the rooted cutting directly into the garden. Ensure the planting site receives full sunlight and has well-drained soil. Henna plants prefer loamy soil that’s rich in organic matter.
- Indoor Growing: If you’re growing your henna plant indoors, ensure the pot is large enough to accommodate the roots. Henna plants can grow up to 10 feet tall, so give them enough space to thrive.
9. Ongoing Care and Maintenance
- Watering: Once your henna plant is established, it doesn’t require much water. Water it regularly, but make sure the soil is well-drained to avoid root rot.
- Fertilizing: Feed your henna plant with a balanced liquid fertilizer once a month during the growing season (spring to summer). Avoid fertilizing in winter when the plant is dormant.
- Pruning: As your henna plant grows, you may want to prune it to maintain its shape and encourage bushier growth. Trim any leggy branches and dead stems.
Conclusion
Growing mehndi/henna from cuttings at home is a simple, effective way to enjoy this fragrant, medicinal plant and its beautiful green leaves. With just a few simple steps—choosing healthy cuttings, preparing the right soil, and creating an ideal environment for rooting—you can have your own henna plant thriving in your home or garden. Whether you’re interested in creating your own henna paste or simply want to add a unique tropical shrub to your home, growing henna from cuttings is a rewarding experience. Happy planting!


