Growing a plum tree from a cutting is a rewarding and cost-effective way to propagate this delicious fruit tree in your garden. While growing plum trees from seeds is also an option, taking a cutting allows you to replicate a healthy, mature tree with the same characteristics as the parent plant. In this guide, we’ll walk you through the process of how to grow a plum tree from a cutting, ensuring a successful root system and strong growth.
Why Grow a Plum Tree from a Cutting?
Propagating plum trees from cuttings has several advantages:
- Genetic consistency: A cutting produces a tree genetically identical to the parent, meaning you’ll get the same fruit quality and characteristics.
- Faster growth: Plum trees grown from cuttings tend to grow more quickly than those grown from seed.
- Cost-effective: Instead of buying a mature tree, you can propagate one from a cutting, saving money.
What You’ll Need to Grow a Plum Tree from a Cutting
Before you start, gather the necessary materials:
- Healthy plum tree: Select a mature tree with desirable traits, such as good fruit production and resistance to diseases.
- Sharp pruning shears: To take a clean cutting.
- Rooting hormone: This will stimulate the cutting to grow roots.
- Pot or container: To house the cutting while it roots.
- Well-draining potting mix: A mixture that provides good drainage and supports root development.
- Plastic bag or dome: To create a humid environment for the cutting.
Step-by-Step Guide to Growing a Plum Tree from a Cutting
1. Select the Right Time for Taking Cuttings
The best time to take plum tree cuttings is during the dormant season, which is typically in the late fall or early winter. However, semi-hardwood cuttings can also be taken in late summer to early autumn. Choose a healthy, disease-free branch that is not too old or too young—around 1 to 2 years of growth.
2. Take the Cutting
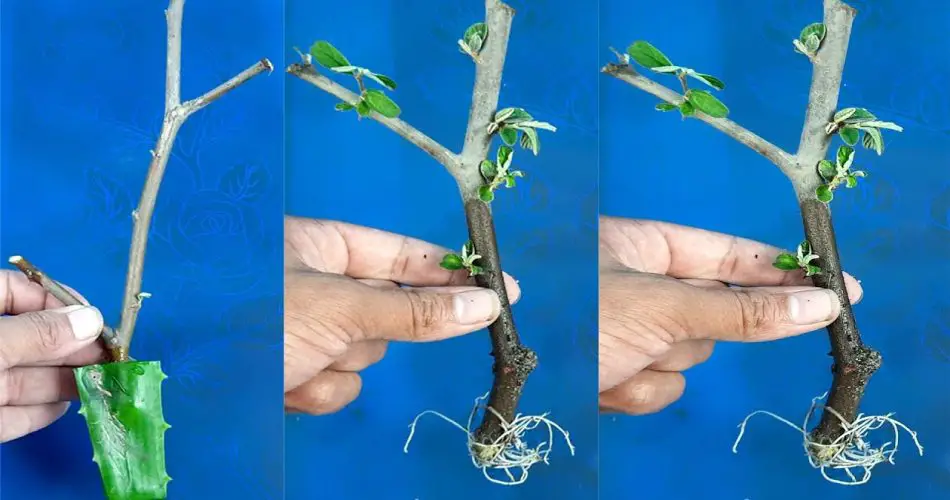
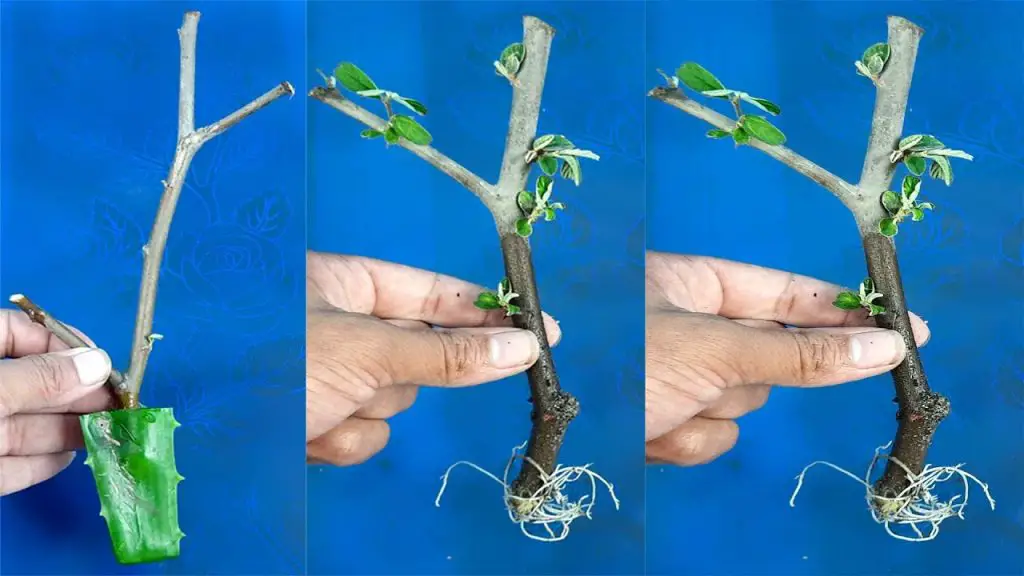
Using sharp pruning shears, cut a 6- to 8-inch section of stem from the plum tree. Make sure the cutting is free from any flowers or fruit and has at least 2 or 3 leaf nodes (the spots on the stem where leaves grow). Ensure the cut is made just below a node to help the cutting develop strong roots.
3. Prepare the Cutting
Remove any leaves or branches from the lower half of the cutting, leaving only a few leaves at the top. This allows the cutting to focus its energy on root development rather than sustaining leaves.
Next, dip the cut end of the cutting into rooting hormone to encourage root growth. Tap off any excess hormone, as too much can harm the cutting.
4. Plant the Cutting
Fill a small pot or container with a well-draining potting mix. Create a hole in the soil with a stick or your finger, then gently place the cutting into the hole. Firm the soil around the base of the cutting to hold it upright.
Make sure the cutting is deep enough in the soil for stability but not too deep, as it may hinder root development.
5. Create a Humid Environment
To help the cutting retain moisture and stay hydrated, cover the pot with a plastic bag or a plastic dome. This will create a greenhouse effect and keep the air around the cutting humid. Be sure the plastic does not touch the cutting itself to avoid mold growth.
Place the pot in a warm, bright location, but avoid direct sunlight, which can overheat the cutting. Ideal temperatures are between 65°F to 75°F (18°C to 24°C).
6. Maintain Moisture Levels
Check the soil regularly to ensure it remains slightly moist. Be careful not to overwater, as this can lead to rot. If the humidity inside the plastic bag or dome seems to drop, lightly mist the cutting to maintain the moisture levels.
7. Monitor Root Growth
After about 4 to 6 weeks, gently tug on the cutting to feel for resistance. If there is resistance, this indicates that the cutting has developed roots. At this point, remove the plastic covering and allow the cutting to harden off by gradually exposing it to more air circulation and sunlight.
Transplanting the Plum Tree Cutting
Once the cutting has established a good root system, it’s time to transplant it into a larger pot or directly into your garden. Choose a location with plenty of sunlight and well-draining soil to ensure the tree’s health.
To transplant, carefully remove the cutting from its pot and place it into a larger container or dig a hole in your garden. Make sure to water it thoroughly after transplanting to settle the roots.
Caring for Your Plum Tree
After transplanting, it’s important to continue caring for your young plum tree by:
- Watering consistently but not excessively.
- Fertilizing once a year with a balanced fertilizer to promote growth.
- Pruning as needed to shape the tree and remove any dead or diseased branches.
- Protecting from pests and diseases by keeping the tree healthy and strong.
Conclusion
Growing a plum tree from a cutting is an easy and effective way to propagate your favorite fruit tree. By following the steps outlined in this guide, you can successfully grow your own plum tree, enjoy the process, and reap the rewards of fresh, homegrown plums for years to come. Happy gardening!


