The Java plum, also known as black plum or jamun (Syzygium cumini), is a tropical tree that produces small, round, dark purple fruits with a sweet and tangy flavor. Growing a Java plum tree from cuttings can be a rewarding and cost-effective way to propagate this delicious fruit tree. In this article, we’ll walk you through the process of successfully growing a jamun tree from cuttings.

Why Grow a Java Plum Tree from Cuttings?
Growing a Java plum tree from cuttings offers several benefits:
- Faster growth: Trees grown from cuttings tend to grow faster than those grown from seeds.
- Consistency: You can be sure that the tree will have the same characteristics as the parent tree, including fruit quality and size.
- Convenience: Growing from cuttings is more efficient and guarantees quicker results compared to starting from seed.
Materials Needed to Grow Java Plum from Cuttings:
Before you begin, make sure you have the following materials:
- Healthy, mature Java plum tree (parent plant) to take the cutting from
- Sharp knife or pruning shears
- Rooting hormone (optional but recommended)
- Pot with well-draining soil
- Plastic bag or plastic wrap
- Watering can or spray bottle
- Clean, sharp scissors or blades
Step-by-Step Guide to Growing a Java Plum Tree from Cuttings:
Step 1: Select the Right Cutting
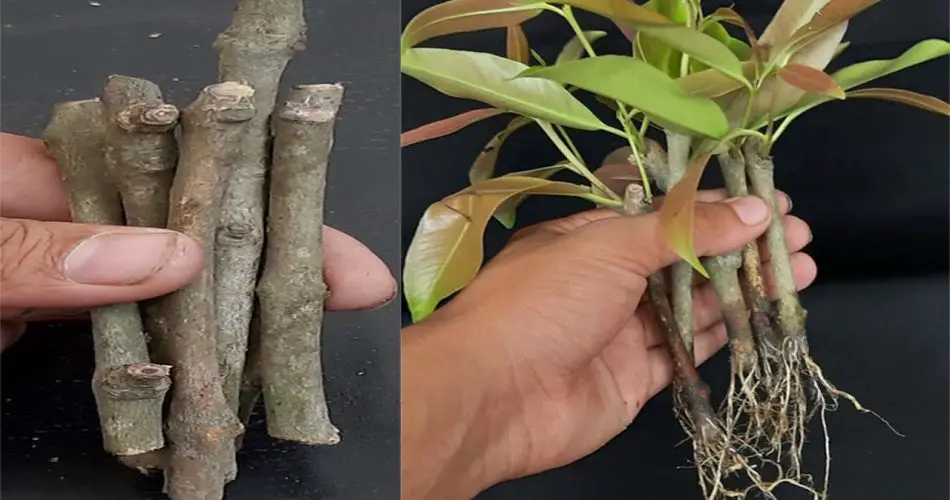
- Choose a healthy parent tree: To start, pick a healthy and disease-free Java plum tree as the parent plant. The cutting should come from a mature and disease-free tree.
- Take the cutting: Cut a 6-8 inch long softwood or semi-hardwood cutting from the current season’s growth. Make sure the cutting is about the thickness of a pencil, and choose a branch with at least 2-3 leaves.
Step 2: Prepare the Cutting
- Trim the leaves: Remove the lower leaves from the cutting, leaving just the top 2-3 leaves. This helps the cutting conserve energy and reduces the risk of fungal diseases.
- Cut the base at an angle: Using a sharp knife or pruning shears, cut the base of the cutting at a 45-degree angle. This increases the surface area for rooting.
- Optional – Apply rooting hormone: If you have rooting hormone, dip the base of the cutting into the hormone. This will stimulate root growth and increase the chances of success. Shake off any excess powder.
Step 3: Plant the Cutting
- Prepare the pot: Choose a small pot with well-draining soil. You can use a mixture of sand and compost for optimal drainage. Fill the pot about halfway with soil.
- Plant the cutting: Insert the cutting into the soil about 2-3 inches deep. Gently firm the soil around the cutting to hold it in place. Ensure that the cutting is upright and secure.
Step 4: Provide Ideal Growing Conditions
- Cover the cutting: To retain moisture and create a humid environment, cover the pot with a plastic bag or plastic wrap. Ensure the bag doesn’t touch the cutting itself by propping it up with sticks or small supports.
- Place the pot in a warm, bright spot: Keep the pot in a bright, warm location with indirect sunlight. A spot with filtered light works best to prevent the cutting from getting too much direct sun, which could dry it out.
- Maintain humidity: Keep the soil moist but not soggy. Mist the cutting with water regularly using a spray bottle to maintain humidity. This encourages the roots to grow without drowning the cutting in excess water.
Step 5: Wait for Rooting
- Check for roots: After about 3-6 weeks, the cutting should develop roots. You can check by gently tugging on the cutting – if it resists, this means the roots have started to form.
- Gradual acclimatization: Once the cutting has rooted and new growth starts to appear, gradually acclimatize the plant to outdoor conditions by slowly removing the plastic bag over a week. This process is known as hardening off.
Step 6: Transplant the Java Plum Tree
- Prepare a larger pot or garden bed: Once the cutting has rooted and grown a bit larger, you can transplant it into a larger pot or directly into your garden. Ensure that the soil is well-draining and enriched with compost.
- Water and fertilize: Keep the soil consistently moist and water the plant regularly. You can also add a balanced liquid fertilizer once a month to encourage growth.
Additional Care Tips for Java Plum Trees:
- Sunlight: Java plum trees thrive in full sunlight. Ensure your tree receives at least 6-8 hours of direct sunlight each day for healthy growth.
- Soil: The tree prefers well-draining soil. Avoid waterlogging, as this can cause root rot.
- Watering: Water the tree regularly, but ensure that the soil is not soggy. Water when the top inch of soil feels dry to the touch.
- Pruning: Prune the tree regularly to maintain its shape and remove any dead or diseased wood.
Conclusion
Growing a Java plum tree from cuttings is a simple and rewarding process. By following the steps outlined above, you can successfully propagate a healthy jamun tree that will eventually produce delicious fruits for you to enjoy. With patience and care, your new tree will grow strong and thrive in your garden, providing you with a unique tropical fruit for many years to come! 🌱


