Grafting is an essential technique used by gardeners and horticulturists to propagate fruit trees, particularly mango trees. It allows you to combine the best qualities of two different plants – the rootstock (the plant’s root system) and the scion (the part of the plant that will produce the fruit). This technique helps to produce healthier trees, faster fruiting, and trees that are more resistant to disease. If you’re wondering how to graft a mango tree, this simple guide will help you achieve success and enjoy a bountiful harvest in no time.
Why Graft a Mango Tree?
Grafting a mango tree offers several advantages:
- Faster fruiting: Grafted mango trees can bear fruit in as little as 2-3 years, much faster than seed-grown trees, which can take up to 5-7 years.
- Disease resistance: By selecting the right rootstock, grafting can result in a mango tree that is more resistant to diseases and environmental stresses.
- Better quality fruit: The scion of a grafted tree will produce high-quality fruit, often from a variety known for its excellent taste and size.
- Size control: Grafting can help control the size of the tree, making it easier to manage and harvest.
Types of Grafting for Mango Trees
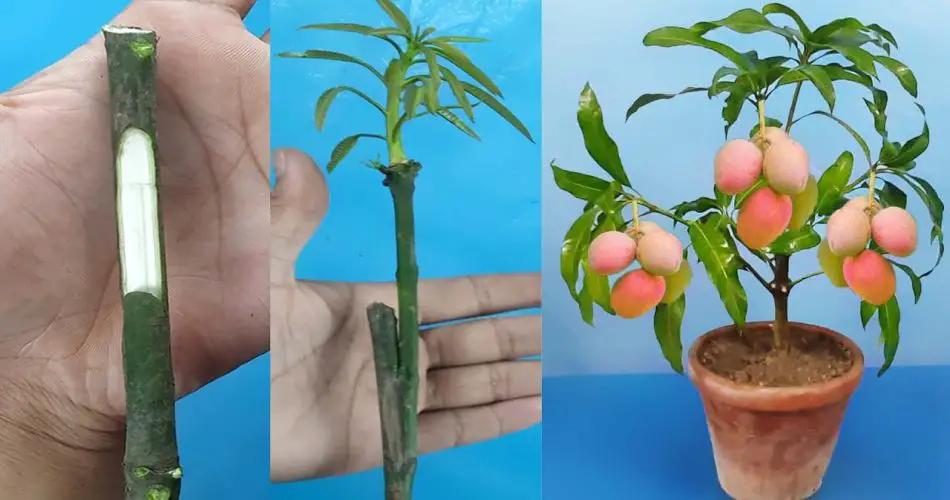
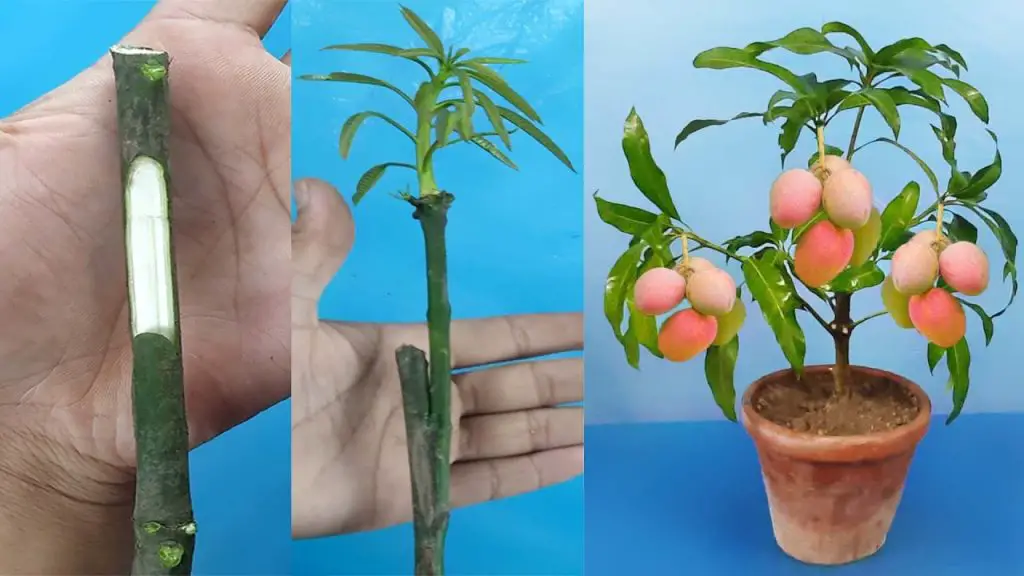
There are several grafting techniques that can be used for mango trees, but the most common and effective method is cleft grafting. Here’s a breakdown of the main types:
- Cleft Grafting:
- Method: A cleft graft is performed by making a vertical cut into the rootstock and inserting a scion into the split. This is one of the most popular methods for grafting mango trees.
- Best for: Large rootstocks and when grafting onto mature mango trees.
- Side Grafting:
- Method: In this method, a slanted cut is made on the side of the rootstock, and the scion is inserted.
- Best for: Smaller or younger rootstocks.
- Tongue Grafting:
- Method: A tongue-shaped cut is made on both the scion and the rootstock, allowing them to fit snugly together.
- Best for: Precise grafting with smaller pieces of scion wood.
Step-by-Step Guide to Grafting a Mango Tree
Step 1: Choose the Right Time
- The best time for grafting a mango tree is during the active growing season when the tree is not dormant. Ideally, graft in spring or early summer when the sap is flowing, and the plant is more receptive to the graft.
Step 2: Select the Rootstock and Scion
- Rootstock: Choose a healthy mango tree rootstock that is disease-resistant and suited to your local climate. Rootstocks are usually seedlings of mango trees or other related species like Indian mango or water mango.
- Scion: Select a mature scion (usually 6-8 inches long) from a mango tree variety that you want to propagate. The scion should be healthy and free of disease.
Step 3: Prepare the Tools
You will need:
- A sharp grafting knife or pruners
- Grafting tape or planting wax
- A grafting sealant (optional but recommended)
- A clean cloth for sterilizing tools
Sterilize all tools to prevent the transfer of any diseases to the graft.
Step 4: Make the Cuts
- Rootstock: Make a clean, vertical cut in the rootstock, about 4-6 inches above the soil. Use the knife to split the rootstock into two halves, creating a cleft for the scion.
- Scion: Make a slanted cut on the bottom of the scion to match the shape of the cleft in the rootstock. The cut should be sharp and precise for a good fit.
Step 5: Insert the Scion into the Rootstock
- Carefully slide the scion into the cleft of the rootstock, ensuring that the cambium layers (the green tissue just below the bark) of both the rootstock and scion are aligned.
- This is crucial, as the cambium layers need to touch for successful grafting.
Step 6: Secure the Graft
- Once the scion is in place, secure it with grafting tape or grafting wax. Make sure the graft is tightly sealed to prevent air or moisture from getting in, which could hinder the grafting process.
- Cover the entire graft junction, leaving the top of the scion exposed to allow for new growth.
Step 7: Protect the Graft
- Place the grafted tree in a shady location with indirect sunlight for a few days. This will allow the graft to heal and reduce the chance of sunburn.
- After about 1-2 weeks, remove the tape to allow the scion to breathe and start growing.
Aftercare for Grafted Mango Trees
Once the graft has successfully taken and the scion begins to show signs of new growth, it’s time to focus on proper care:
- Watering: Water the tree lightly, ensuring the soil is moist but not soggy. Overwatering can lead to graft failure.
- Fertilizing: After the graft takes, fertilize the mango tree with a balanced fertilizer to encourage growth. Be careful not to over-fertilize.
- Pruning: Once the tree starts growing vigorously, prune away any competing shoots from the rootstock to direct all the energy into the scion.
- Sunlight: Gradually expose the grafted tree to more sunlight as it begins to strengthen.
Conclusion
Grafting mango trees is a wonderful technique that allows you to cultivate high-quality, fruit-bearing trees faster and more efficiently. By following the grafting technique outlined above, you’ll be able to propagate your favorite mango varieties and enjoy a steady supply of fresh fruit. Whether you’re an experienced gardener or just starting, mango grafting is a rewarding skill that can improve your gardening success and bring delicious mangoes to your home. Happy grafting!


